FREE PATTERN – farmhouse granny square baby blanket
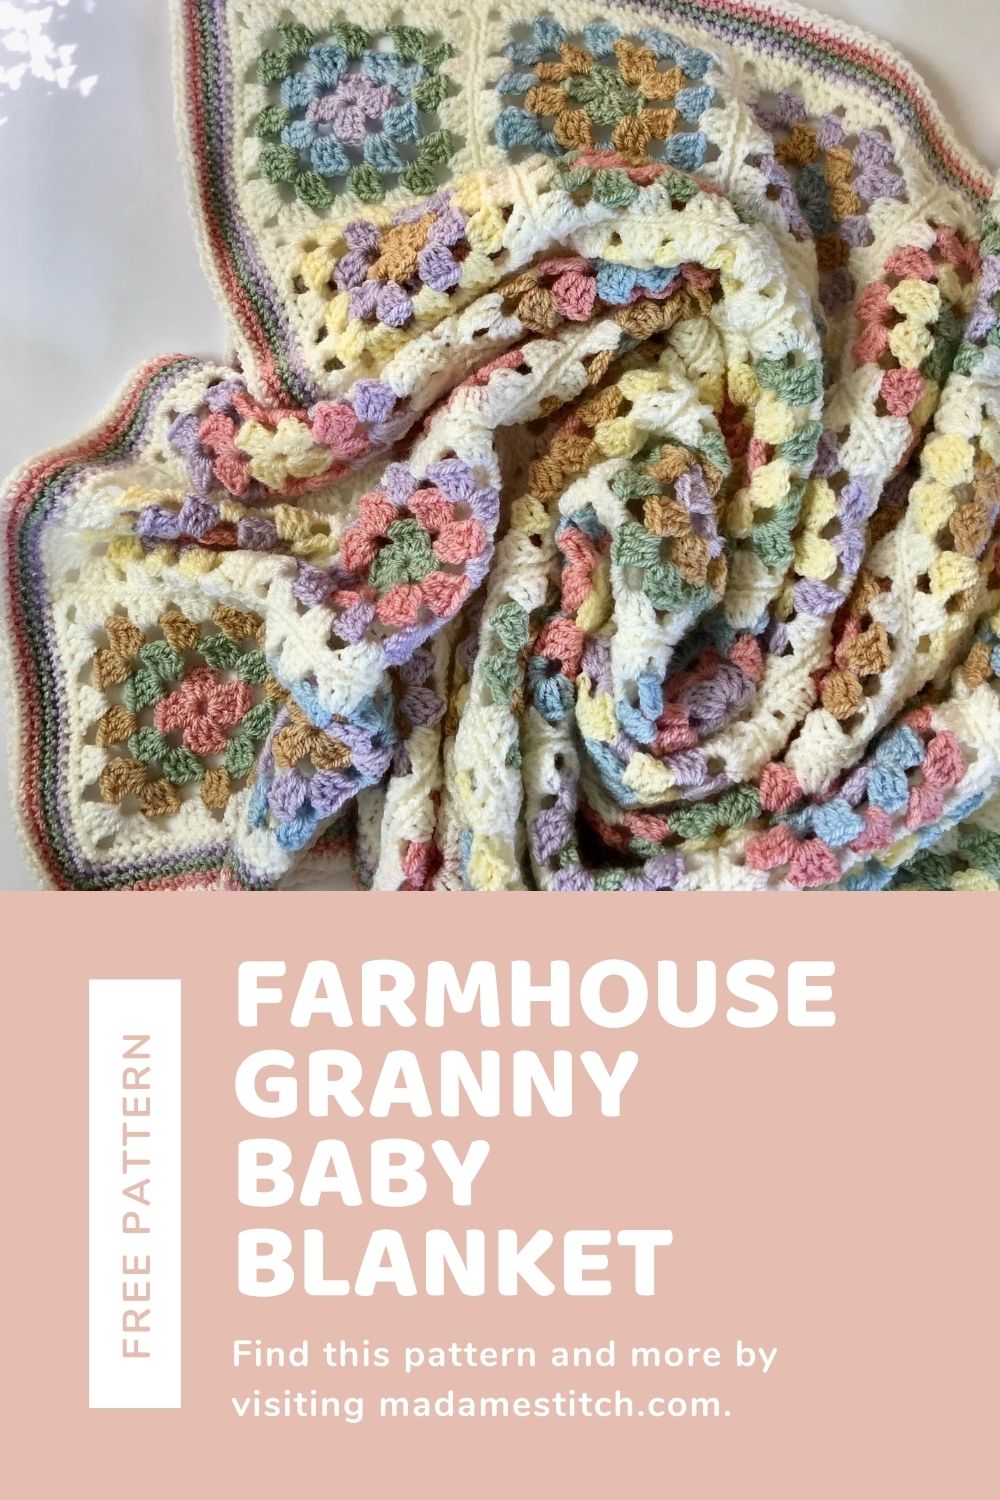
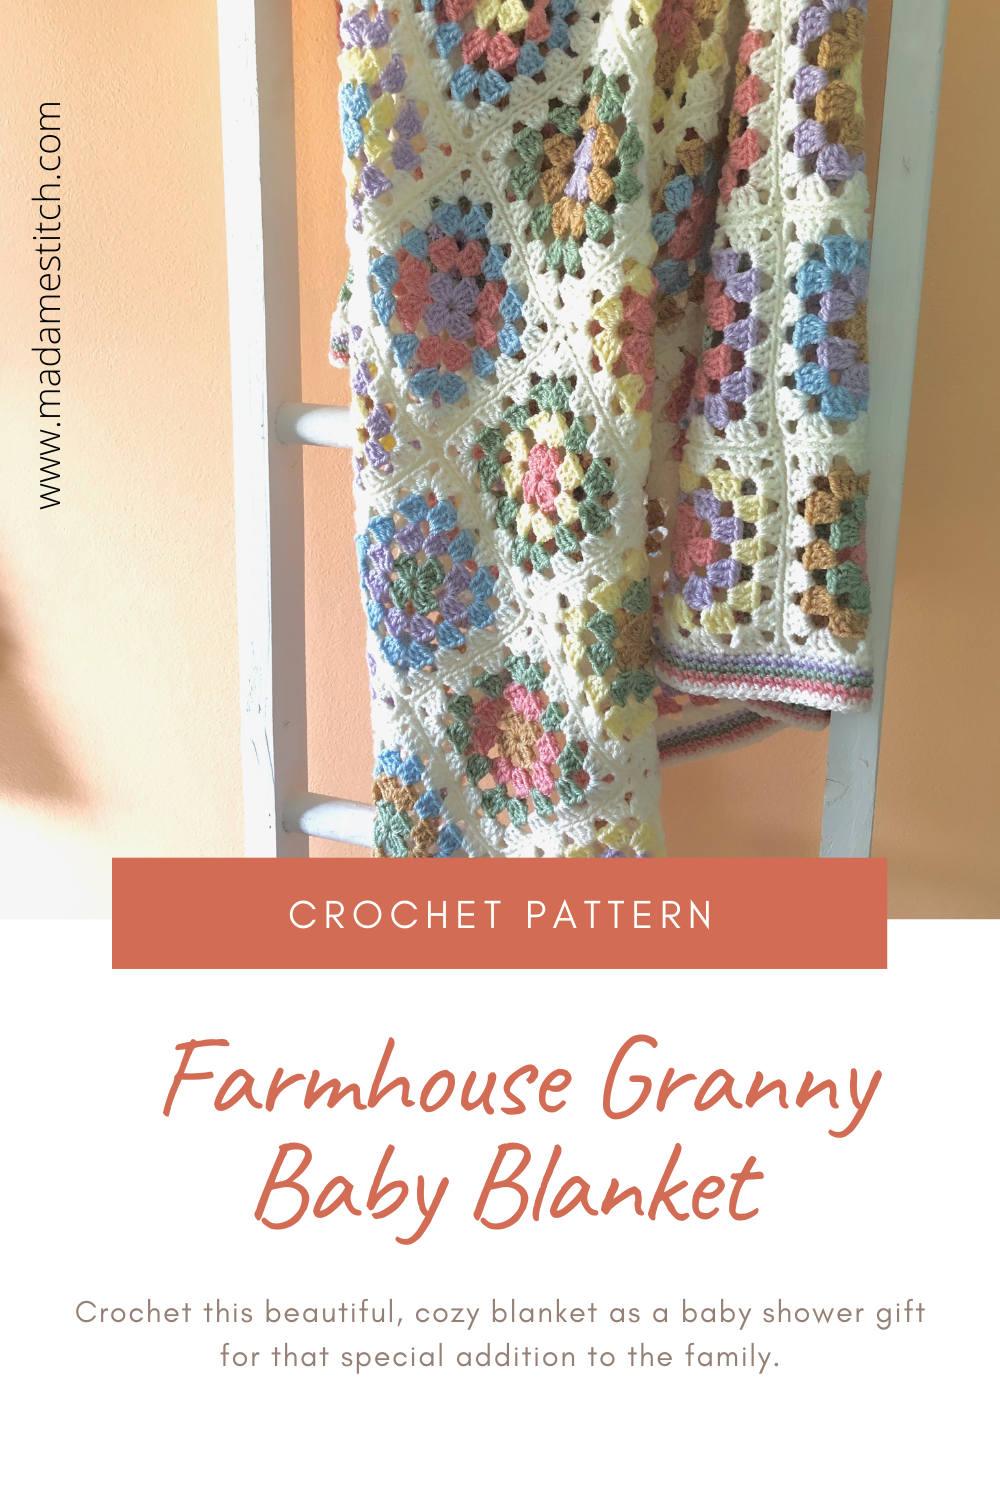
Crochet a granny square baby blanket for that special new addition to the family. Choose rustic colors from the Paintbox Simply DK line.
I love to make baby blankets! Not only are they fun to crochet, they’re a joy to gift. Any time I hear of an impending birth, whether it be family or friend, the hook comes out and I’m ready to go.
I also love granny squares because they are such a simple elegant way to put together a cozy, comfy blanket. The color combinations and yarn choices make for an endless number of possibilities. If you’ve never made a granny square before, I have a great tutorial HERE.
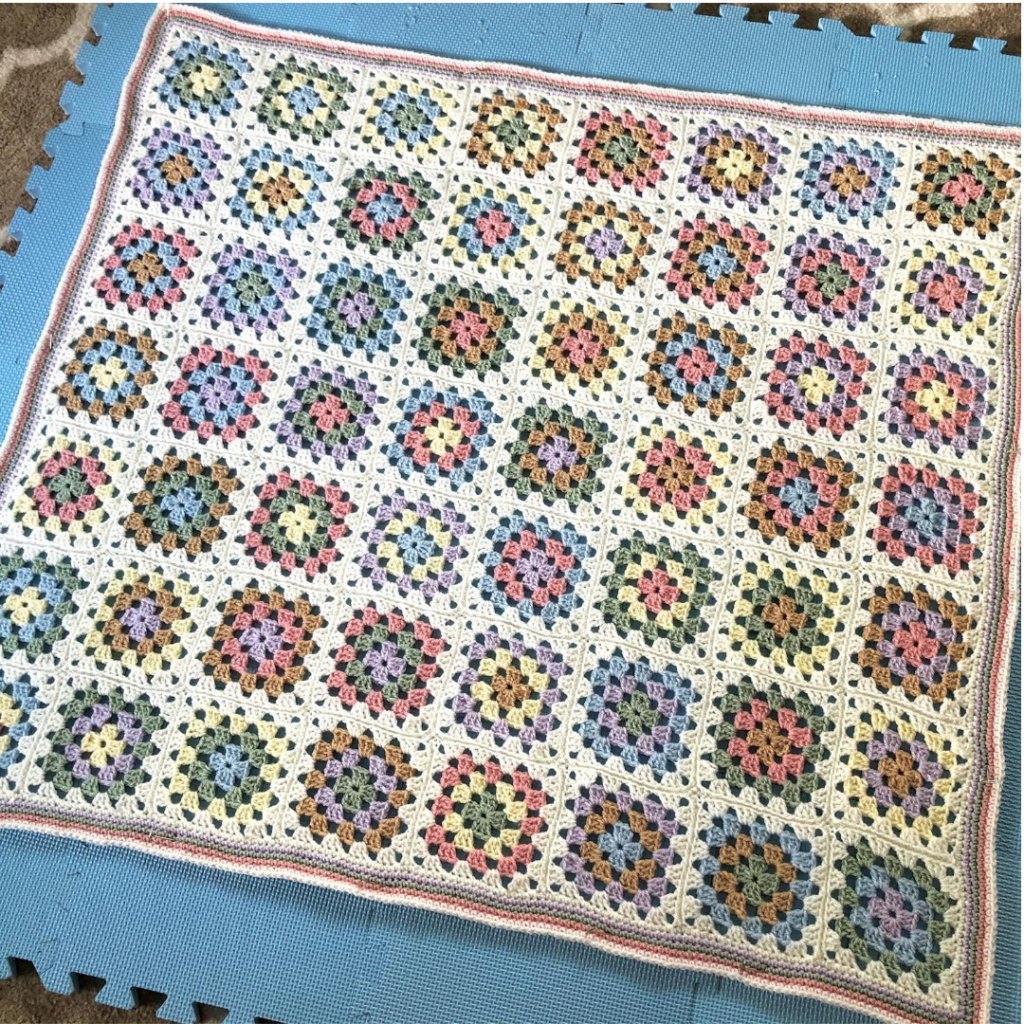
This particular blanket is designed for a friend who just had an adorable little girl. The colors I chose and the simple design are meant to be a bit rustic and definitely home-y. Each square is 4 rounds, the first 3 rounds each worked in a different color, with the fourth round in the main color to bring it all together. The 56 squares are seamed with a slip stitch seam and finished off with a border of single crochet.
This blanket makes the perfect gift for a newborn or for any young child. And, it makes the perfect project for these warmer summer days because the granny squares can be made on the go and assembled while sitting with your favorite tv show.
The Yarn for the granny square blanket
I love choosing a dk weight yarn for a baby blanket because of its light weight and cozy drape. This blanket was made with Paintbox Yarns “Simply DK”. I’ve never used this yarn before and it won’t be the last time! It’s just so soft and cozy. Did I mention it’s also inexpensive and readily available from LoveCrafts?
Where can I purchase the ad-free PDF?
What’s to love about this granny square blanket pattern?
- This is the PERFECT gift for a baby shower.
- You can use the color scheme I’ve created or use your imagination for other possibilities.
- If you love granny squares, this is your next project!
The Farmhouse Granny Square Baby Blanket – Pattern instructions
Thank you for staying on this post and reading my patterns right here on the blog, without copy/pasting. When you stay here to follow the free version of my pattern, I am compensated for my time and energy. This is a great, free way to support a designer. If you would like to save this for later, bookmark the page to save it in your mobile browser.
YARN
Paintbox Yarn “Simply DK” 100% acrylic (3.5oz/302yd; 100g/276m)
Main color (MC) – Champagne White #102 (2-3 skeins)
1 skein of each of these colors:
Color A – Duck Egg Blue #135
Color B – Pistachio Green #124
Color C – Banana Cream #120
Color D – Light Caramel #108
Color E – Blush Pink #153
Color F – Dusty Rose #141
HOOK: US size H-8 (5mm)
TOOLS: Tapestry needle for weaving in ends
NOTES
- The ch 3 at the beginning of each round counts as a dc.
- A note about MC yardage: I purchased 2 skeins of the MC and came close to running out before completing construction. If you make any alterations that increase the size of the blanket, add MC rnds to the border, or crochet loosely, consider purchasing a third skein for the MC.
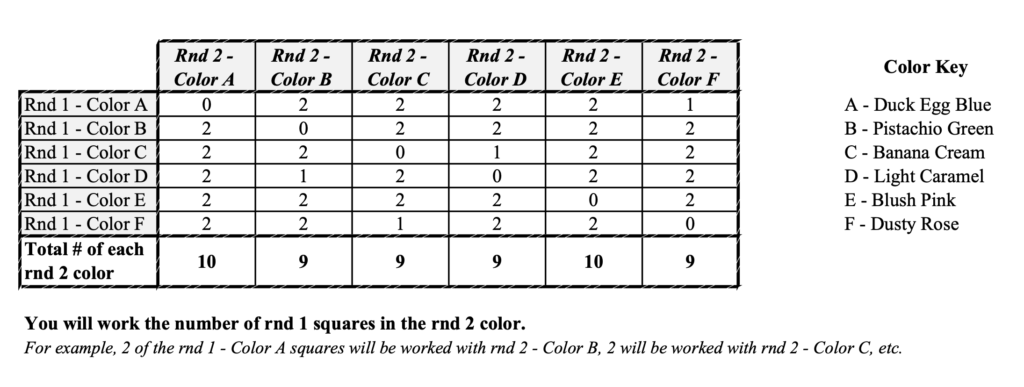
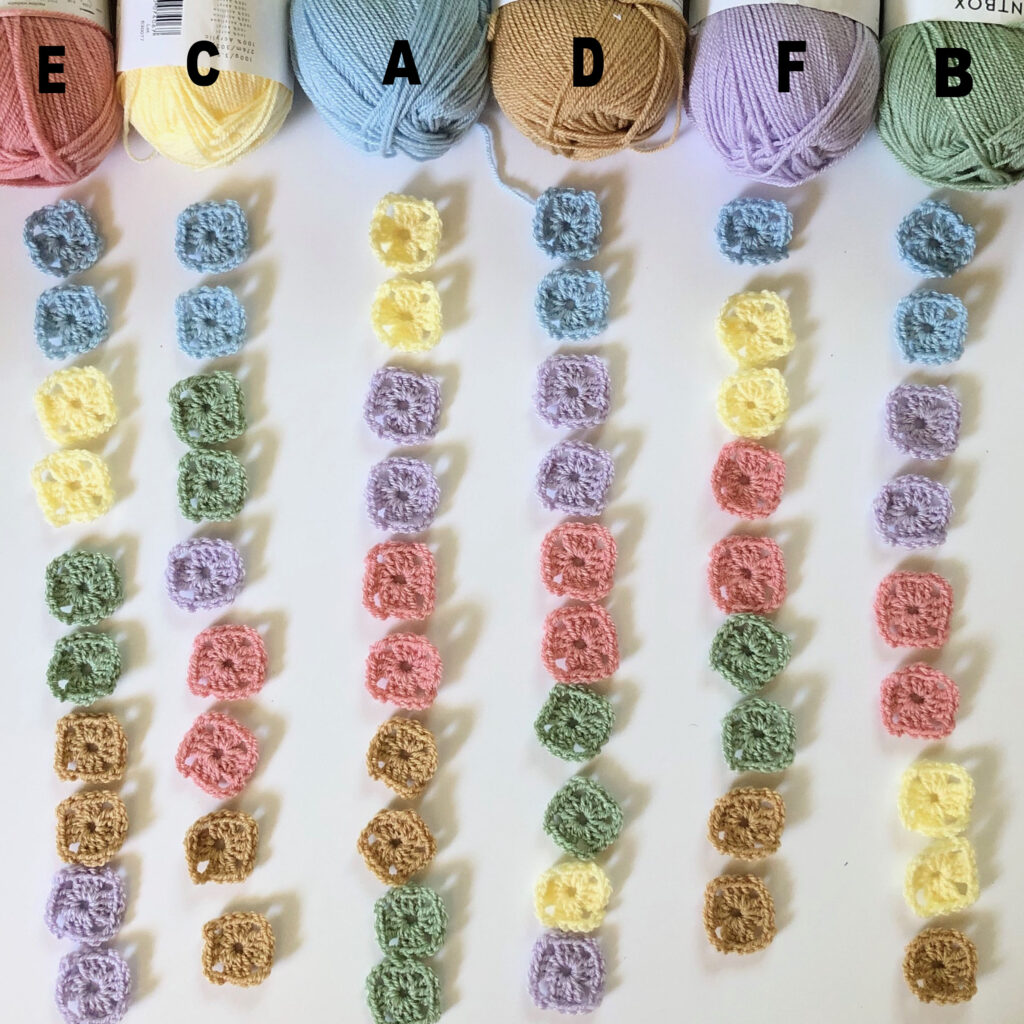
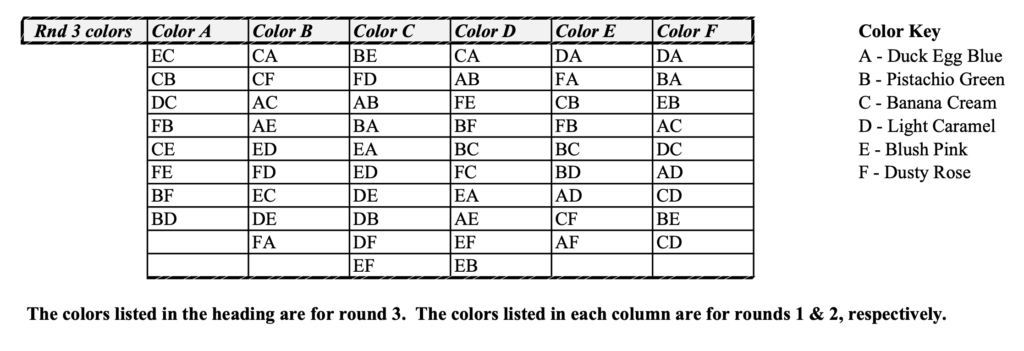
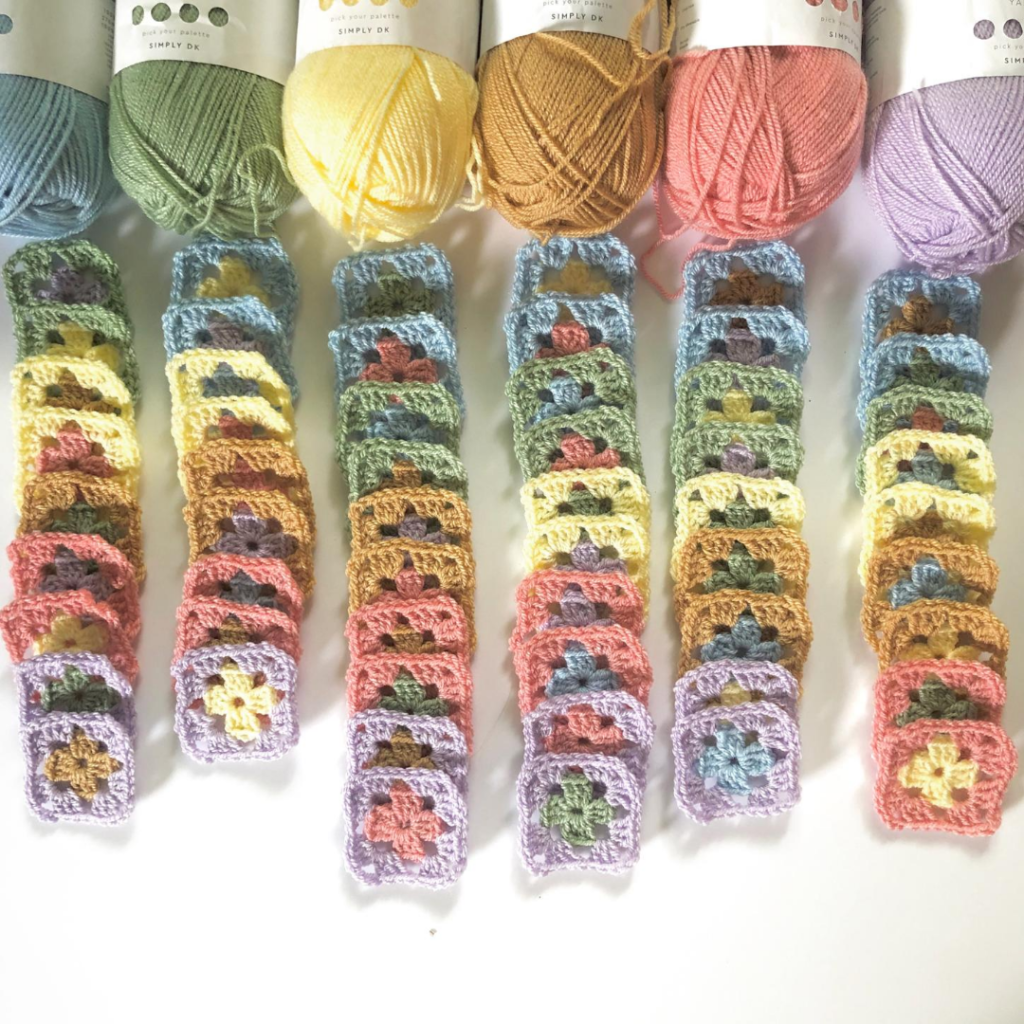
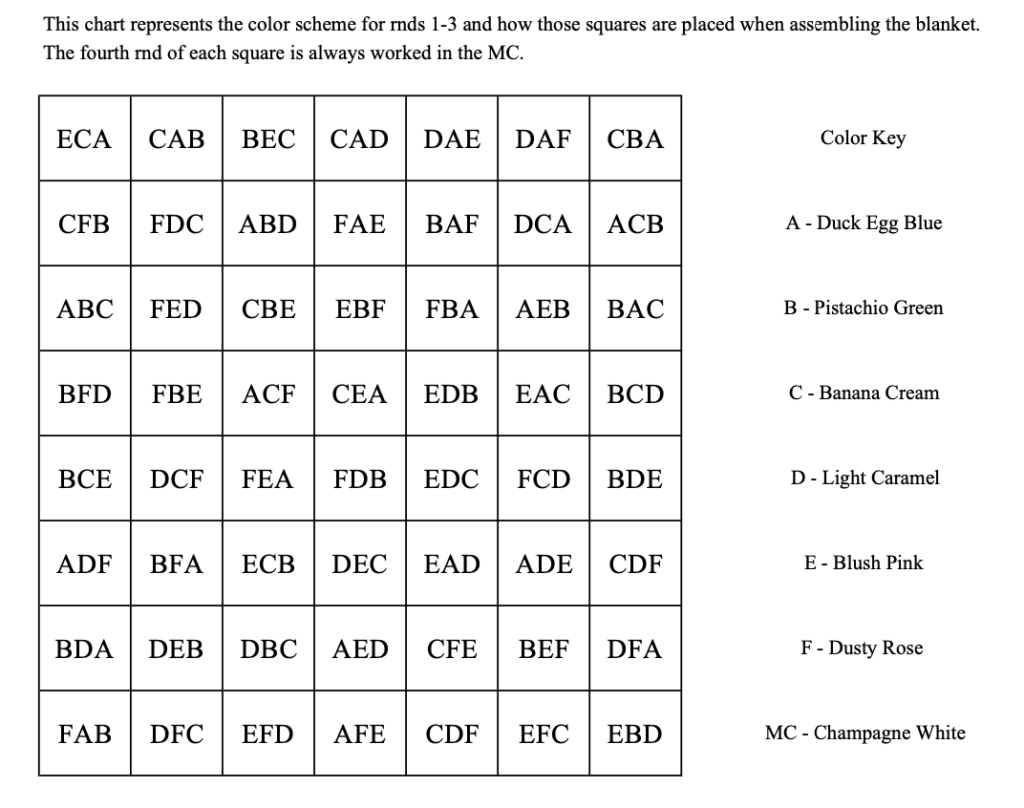
- The construction of the individual squares is traditional 4-rnd granny; however, you will be changing colors after every round. To make it easier to recreate the color scheme in the sample, I have included a guide for the order in which the colors are worked for each round. An assembly chart is also included. As always, you can choose to assemble in any order you like and be as creative with your choices as you want.
- If you’ll be changing colors after each rnd, as instructed, I highly recommend you weave in ends after every rnd worked. You’ll thank me later!
ABBREVIATIONS
- beg – beginning
- ch – chain
- dc – double crochet
- FO – fasten off
- rep – repeat
- Rnd(s) – round(s)
- sc – single crochet
- sp – space
- st(s) – stitch(es)
FINISHED SIZE: Approx. 34” x 38.5” – Each square measures approx. 4.5”.
Pattern Instructions
Thank you for staying on this post and reading my patterns right here on the blog, without copy/pasting. When you stay here to follow the free version of my pattern, I am compensated for my time and energy. This is a great, free way to support a designer. If you would like to save this for later, bookmark the page to save it in your mobile browser.
Granny squares – Make 56, following the color scheme established in the charts. OR, choose your own color scheme.
With first color, ch 4, join with slip st to form ring.
Rnd 1: Ch 3, 2 dc in ring, ch 3, (3 dc in ring, ch 3) 3 times, join with slip st to beg ch 3, FO.
* For rnd 1, make 9 squares of colors A, C, D and F; make 10 squares of colors B and E.
Rnd 2: Attach second color to any corner sp, ch 3, (2 dc, ch 3, 3 dc) in same corner sp, ch 1, * (3 dc, ch 3, 3 dc) in next corner sp, ch 1; rep from *, join with slip st to beg ch-3, FO.
Rnd 3: Attach third color to any corner sp, ch 3, (2 dc, ch 3, 3 dc) in same corner sp, ch 1, 3 dc in ch-1 sp, ch 1, * (3 dc, ch 3, 3 dc) in next corner sp, ch 1, 3 dc in ch-1 sp, ch 1; rep from *, join with slip st to beg ch-3, FO.
Rnd 4: Attach MC to any corner sp, ch 3, (2 dc, ch 3, 3 dc) in same corner sp, (ch 1, 3 dc in ch-1 sp) twice, ch 1, * (3 dc, ch 3, 3 dc) in next corner sp, (ch 1, 3 dc in ch-1 sp) twice, ch 1; rep from *, join with slip st to beg ch-3, FO.
Using a slip stitch seam, stitch the squares together.
Border/edging
Note: The border is worked in 5 rounds of sc. Each round is a different color. I prefer to make the first round in the main color (MC) because it evens out the edge and blends with the last round of the granny squares. For rounds 2-4, I chose colors F, B, & E. The final, 5th round is worked with the main color (MC) to pull it all together. However, you may choose to work the entire border in one color or choose your own combination. More or less rnds may be worked according to your preference.
Rnd 1: Attach MC to any corner, ch 1, 2 sc in corner, sc in every dc and ch-1 sp, plus 1 sc on either side of each seam. Work 3 sc in each of the 4 corner spaces. At the end of the rnd, sc in first corner worked (this completes 3 sc in the first corner sp), join with slip st to beg sc, do not turn.
Rnd 2: With new color, ch 1, 2 sc in same st (partial corner), sc in every st around, working 3 sc in each corner. Work 1 sc in first corner st to complete corner, join with slip st to beg sc, do not turn.
Rnds 3-5: Rep rnd 2, changing color for each rnd, ending with MC for rnd 5. At the end of rnd 5, fasten off and weave in any leftover ends.
Almost done…
Be sure you block to relax the seams. You can either wet block (use a gentle yarn wash) or steam block.
We crochet squares, hats, scarves, and blankets to donate so those in need can feel the warmth and comfort of someone who cares. We crochet for others before we crochet for ourselves.
Crochet Blogger Debi Y
Click on the graphic. If the entry form pops up, fill it out to be entered in the Day 5 drawing.
If it doesn’t, return to the event post and try another link.


This scavenger hunt to celebrate your birthday has been so fun!
I just purchased this pattern and was wondering if I could add granny squares to make it a throw blanket?
Happiest of birthdays!
Ana
Ana,
You can add as many squares as you like to get the final size you’re interested in. It’s very adaptable!
Best,
Debbie
Thank you for the pretty pattern! I just finished it and I love it! Was so fun to make for my grand baby due soon!!
Tamara,
I’m so happy you like the pattern. And, congratulations on becoming a grandma!
-Debbie
Well, your instructions are so appreciated! I love the detail that you gave regarding the management of the colors and the diagram you provided for laying it out! Thank you! I have looked at making a granny square blanket in the past and just wasn’t sure how to complete the random color selection. I seem to have lots of young people in my life that have started having babies and I love making a special blanket for each of them. I think this will be be my next one! Thanks again!
You are so welcome!