The perfect crochet baseball pillow for your #1 team
Create a cozy pillow with this easy-to-follow crochet pattern. Perfect for baseball lovers of all ages, this crochet baseball pillow adds a sporty touch to any space!
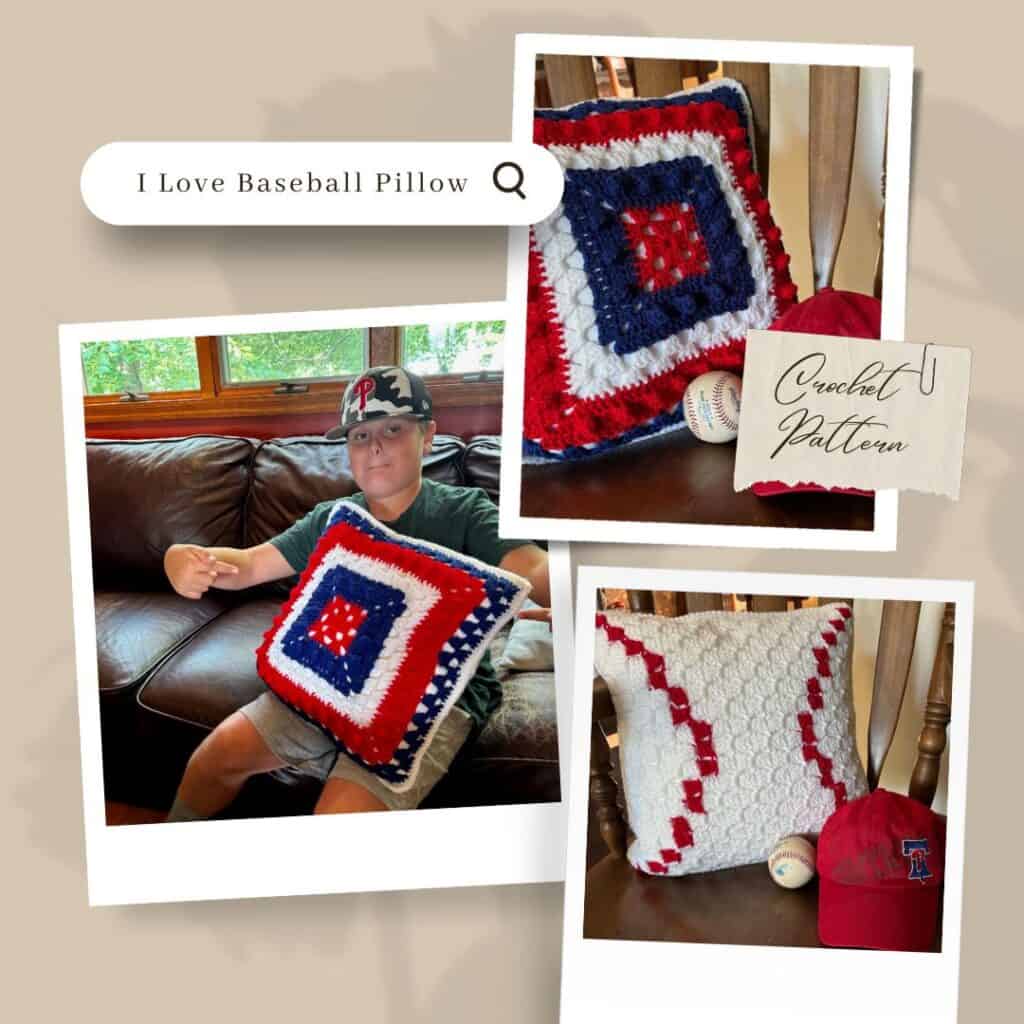
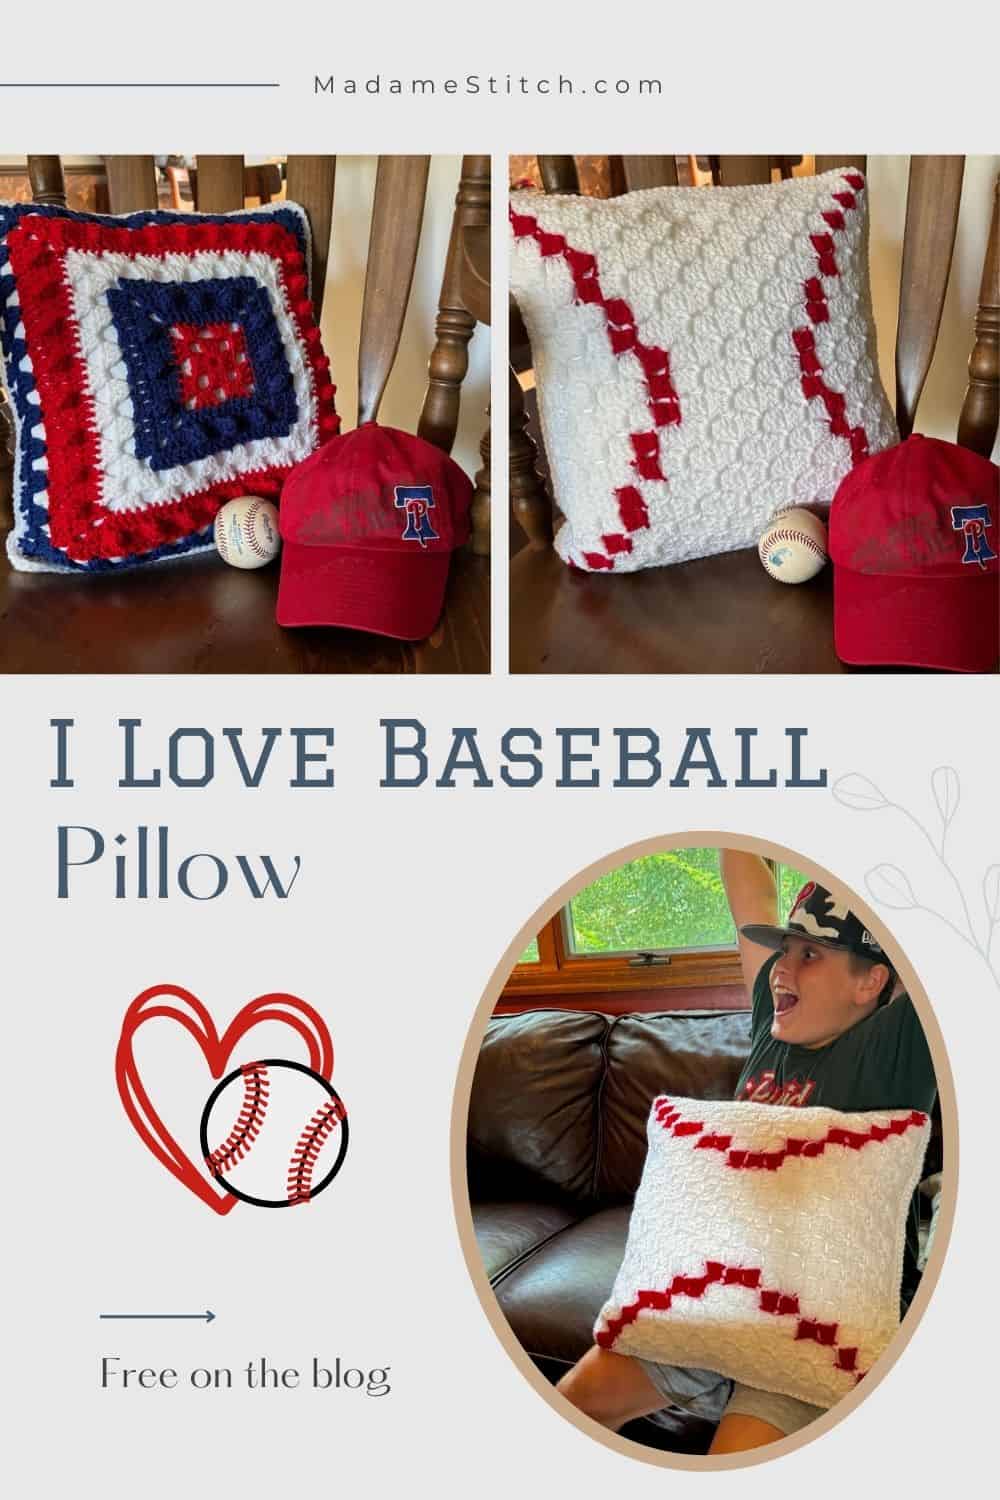
I Love Baseball Pillow
Baseball has been a part of my life ever since I met my husband back in high school. When we were dating, I would go to his games ’cause that’s what a girlfriend does, right?! And, that’s when I started watching MLB and developed a real appreciation for the sport.
When our kids were growing up, they gave baseball and softball a try. But, none of them really cared much about the sport and moved on to other things.
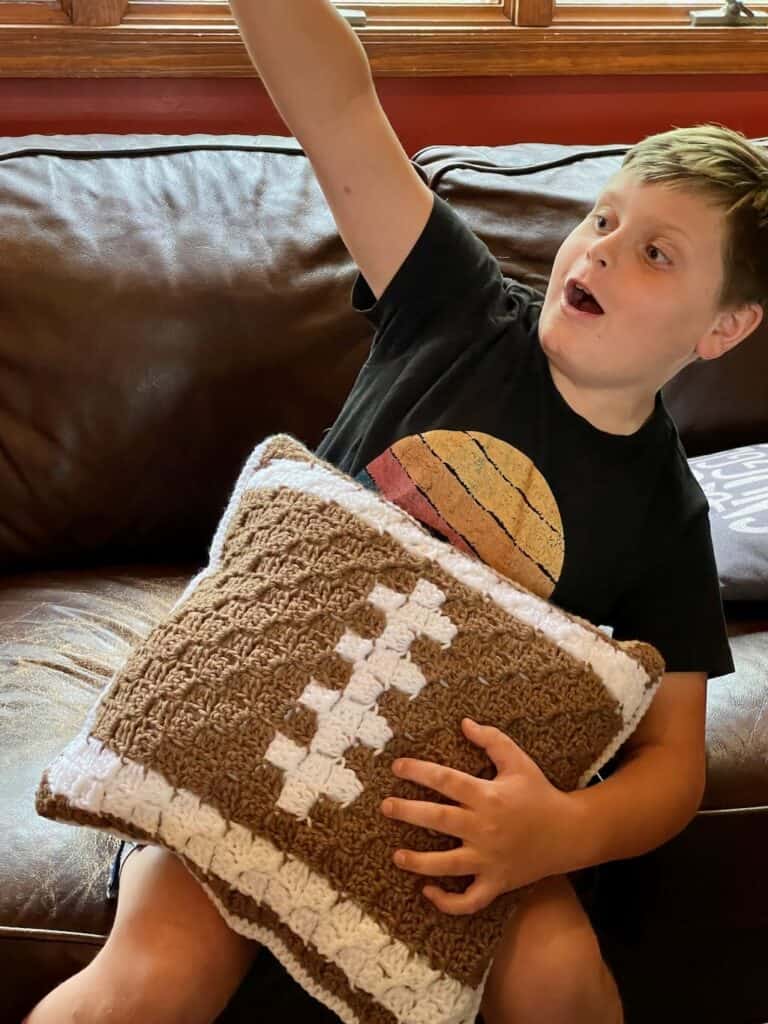
Fast forward to today. My younger grandson is head over heels for baseball. He plays in both the spring and fall leagues. Ask him any stat for the Phillies and he can probably drop you some numbers without looking it up. It’s a thing…
Needless to say, baseball is big in our family.
My grandson’s birthday just happens to be Granny Square Day, August 15th. So, this year I designed the I Love Baseball Pillow to add to his collection.
Design + Construction
I’ve combined 2 common crochet techniques in one baseball pillow – a modified granny square and corner to corner (C2C) crochet.
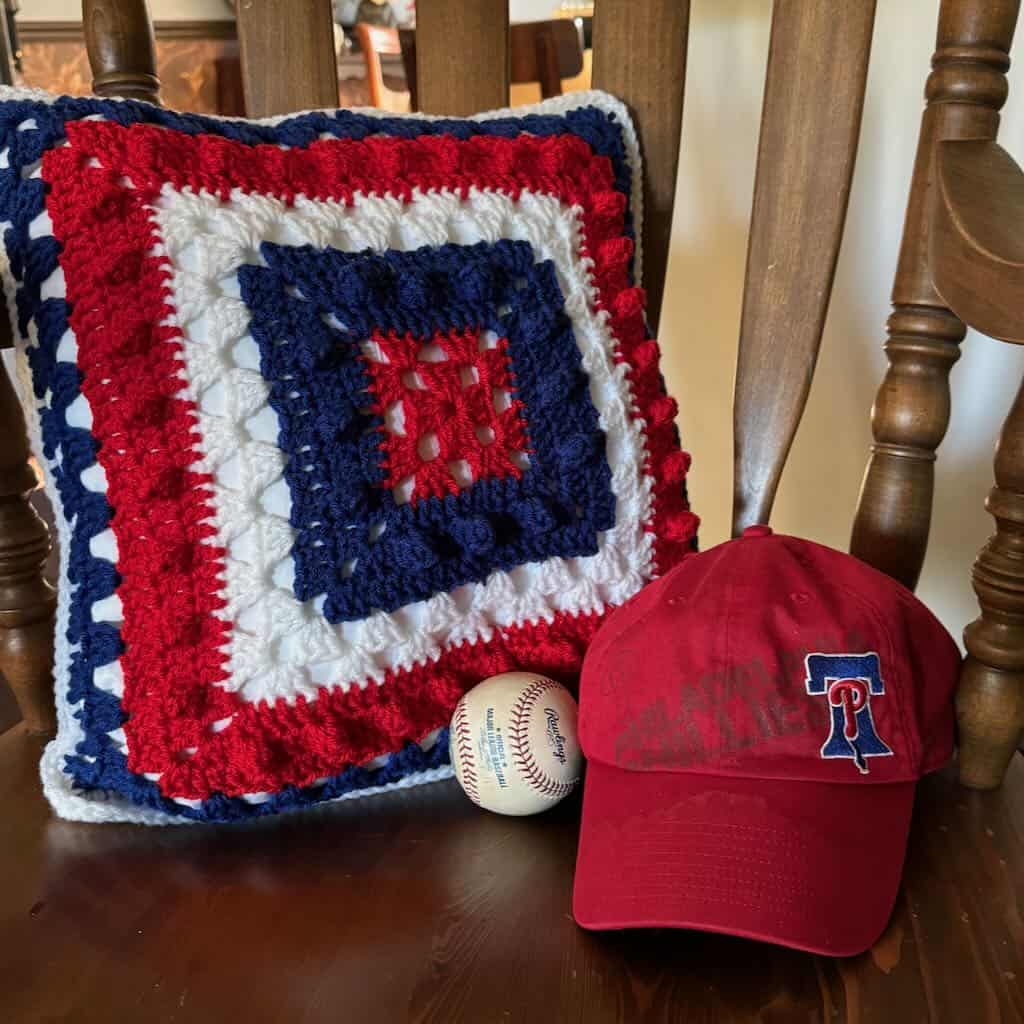
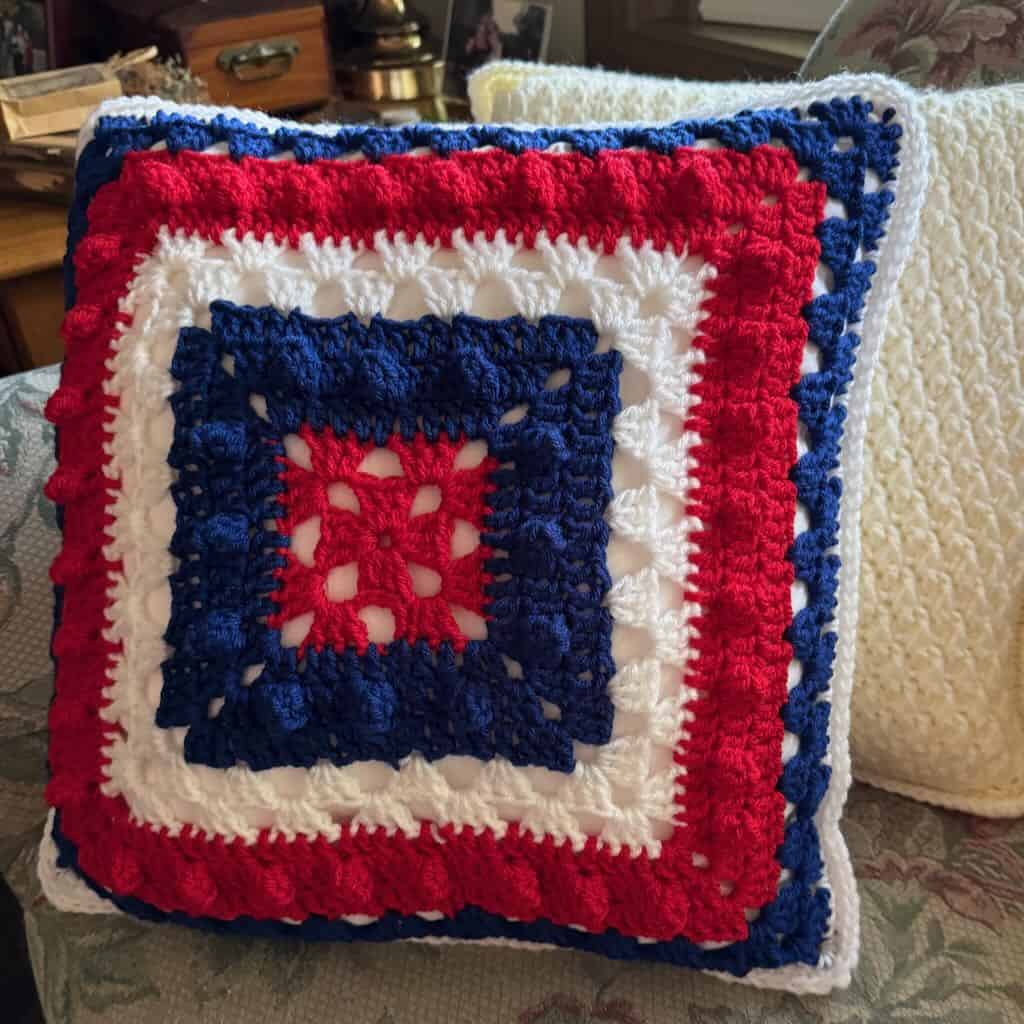
The granny square panel (based on my Grab the Popcorn Granny found here) represents your favorite team. That’s done by working the square in the team colors. We’re Phillies fans so I made my granny square panel in red, white and blue.
The square features alternating sections of granny stitch and solid double crochet with popcorn stitches. I thought this granny square would be a great choice since game time snacks usually include popcorn!
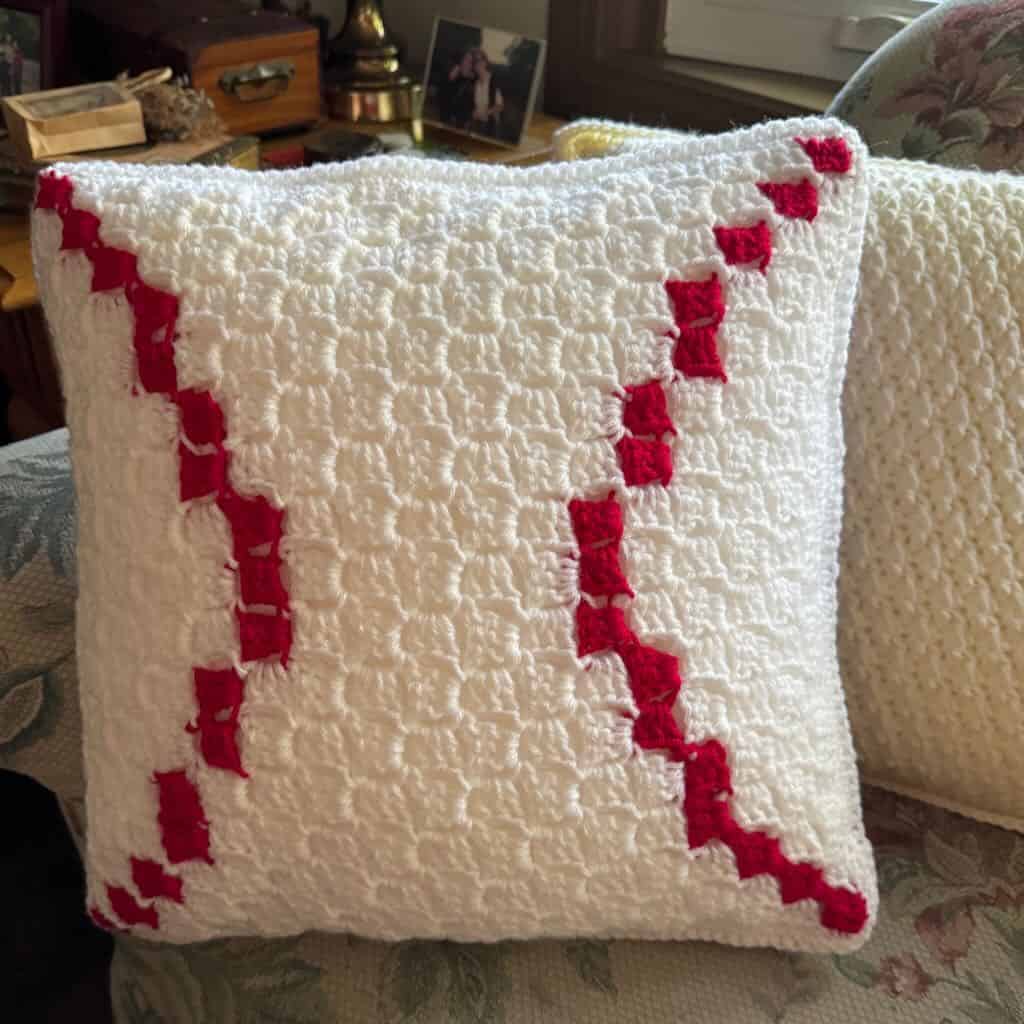
The panel on the other side of the baseball pillow is worked in C2C (corner to corner) crochet and features a baseball look-alike. All you need for this side is red and white yarn (although you could certainly crochet your baseball in a different color if you like).
If you aren’t familiar with C2C using double crochets (the standard C2C technique), this video by Naztazia is excellent.
The finished panels are slightly under 16″ when they’re completed. Blocking isn’t necessary because the panels stretch around the pillow form. This ensures a great fit around the pillow form and keeps your baseball pillow looking great with continued use.
Finally, the 2 panels are joined together with single crochets around the pillow form. While I chose white for my joining color, you can choose anything that suits your personal taste to finish off your baseball pillow!
Tips for personalizing your baseball pillow
- Choose your favorite panel and work 2 identical panels.
- If you have 2 favorite teams, crochet 2 granny squares, one in each of the team’s colors.
- Put pompoms on the 4 corners so you can “cheer” on your team while they play!
I Love Football Pillow
For football fans, my I Love Football Pillow makes a wonderful companion for this baseball pillow. Click here to find out how you can crochet your own football pillow.
The Yarn
This post contains affiliate links. That means, if you purchase something using the link, I receive a small commission. You don’t pay any extra and your information is safe. Thanks for supporting my small business.
Any worsted weight acrylic yarn will work for this crochet baseball pillow. Depending upon what your team’s colors are, finding just the right colors should be more important than the actual yarn.
The pattern is adaptable enough that, as long as you are using worsted weight yarn, the baseball pillow should be the right size. Of course, you can adjust hook size if need be.
Shop your yarn collection first. Then, buy what you need, especially if you’re missing a color.
Because the Phillies’ team colors are red, white and blue, it wasn’t difficult to find enough in my yarn stash to make the baseball pillow with yarn left over. Your team may have a color that’s a little harder to match. Get as close as you can.
Here are some of my favorite yarns for this baseball pillow:
- Lion Brand has several choices – “Vanna’s Choice”, “Basic Stitch”, “Color Theory”
- Knit Picks “Brava Worsted”
- Paintbox Yarns “Simply Aran”
Where to get the PDF for the I Love Baseball Pillow
The I Love Baseball Pillow is a free crochet pillow pattern for blog subscribers in this blog post. Scroll down to view the free version.
However, if you’d like a printer friendly and downloadable version of the PDF, I recommend you purchase it from one of my shops.
The purchased PDF can be uploaded to your favorite mobile device so you can take your crochet pillow project with you to work on whenever you’re out and about.
The PDF is easy to read and beautifully formatted without ads for a great experience. Get your copy today!


The I Love Baseball Pillow Free Pattern
Materials
Yarn
Any worsted weight acrylic in 3 team colors + white and red for the C2C panel
The sample: Philadelphia Phillies team colors
- Color A (CA) – Navy – approx. 70yd
- Color B (CB) – Red – approx. 100yd
- Color C (CC) – White – approx. 210yd
Hook
US size I-9 (5.5mm)
Tools + Materials
- 16″ fiberfill pillow form
- Removable stitch markers
- Tapestry needle for weaving in ends
General Information
Finished Size: 16″ square
Gauge
- Granny square: Rnds 1-3 = 4″
- C2C: Approx. 5 x 5 blocks = 4″
Skill level: Advanced beginner
Abbreviations – US crochet terminology
- beg – beginning
- ch – chain
- dc – double crochet
- rep – repeat
- rnd(s) – round(s)
- sc – single crochet
- sk – skip
- sp – space
- st(s) – stitch(es)
- RS – right side
- WS – wrong side
- YO – yarn over
Special Stitches
Granny stitch (GS) – 3 dc in the same st or sp
Popcorn (PC) – 4 dc in the same st, remove the hook from the working loop, insert the hook from front to back under both loops of the 1st dc worked, slip the working loop back on the hook and pull through the loops of the 1st dc to close the popcorn.
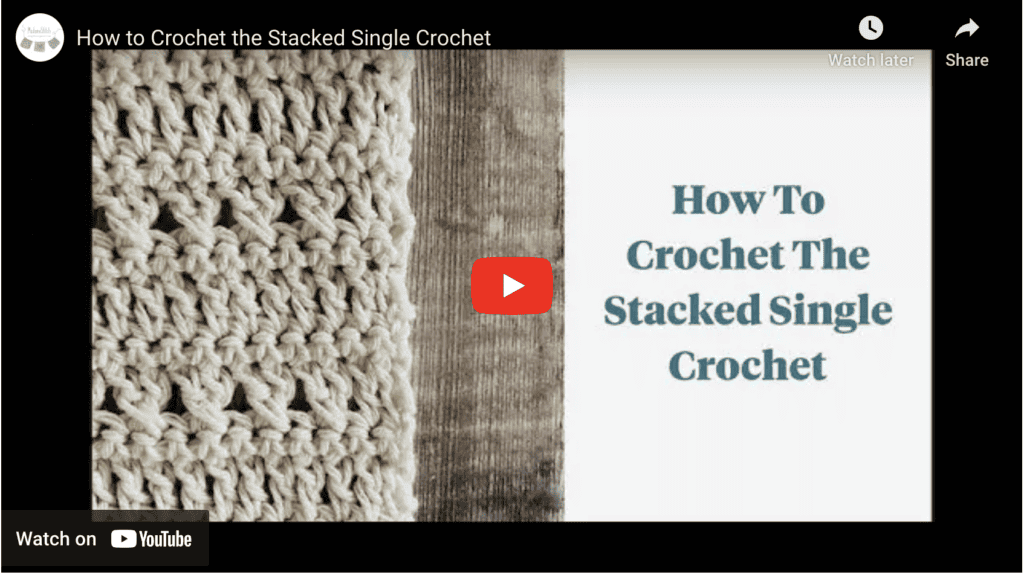
Stacked single crochet (STsc) – (This stitch is used at the beginning of a row or round to replace the traditional turning ch-3. It has the appearance of a dc.) – Insert the hook in the same st as the loop, YO, pull up a loop, YO, pull through 2 loops (bottom sc made), insert the hook in the left vertical bar of the bottom sc, YO, pull up a loop, YO, pull through 2 loops (top sc made).
Pattern Notes
- A ch-1 at the beg of a rnd does not count as a st.
- A ch-2 or ch-3 may be substituted for the STsc at any time without adversely affecting the construction of the square.
- The panels should be 15.5-16” across to fit snugly around the pillow form. The panels will stretch slightly when stitched together. Check gauge during construction to ensure the proper size.
Unlock Exclusive Subscriber Content
To unlock Exclusive Subscriber Content, click on the button in the box below. The Grow.me app window will pop up where you can either create an account or sign in if you already have one.
To create an account, sign in with your existing Google or Facebook account. You can also create an account with an email address and new password.
If you forget your password, simply click the “Forgot my Password”button. I have no access to your Grow account so I’m unable to retrieve or reset your password.
Remember, once you’ve created a Grow account, you never have to do it again. Your Grow account unlocks all the exclusive content created by Grow
Thank you for being a loyal blog subscriber. I hope you enjoy the exclusive content!
Pattern Instructions
Granny Square Panel – Show your team colors!
Note: At the color changes, the working color is dropped, and the new color is picked up at the beg of the next rnd.
With CB, ch 4, join with slip st to form ring. (Or you may use a magic ring if you prefer.)
Rnd 1: (STsc, 2 dc) in the ring (counts as 1st GS), ch 3, [GS in the ring, ch 3] 3 times, join with slip st to beg st. < 4 GS, 4 ch-3 sp >
Rnd 2: Slip st in each st across to and into the ch-3 corner sp, (STsc, 2 dc, ch 3, GS) in the ch-3 corner sp, ch 1, [(GS, ch 3, GS) in the next ch-3 corner sp, ch 1] 3 times, join with slip st to beg st. < 8 GS, 4 ch-1 sp, 4 ch-3 corner sp >
Rnd 3: With CA, STsc, dc in the next 2 sts, (2 dc, ch 2, 2 dc) in the ch-3 corner sp, [dc in each st and ch-1 sp across to the next ch-3 corner sp, (2 dc, ch 2, 2 dc) in the ch-3 corner sp] 3 times, dc in next 3 sts and in the ch-1 sp, join with slip st to beg st. < 44 dc, 4 ch-2 corner sp >
Rnd 4: STsc, dc in the next 2 sts, PC in the next st, dc in the next st, {(2 dc, ch 2, 2 dc) in the next ch-2 corner sp, dc in the next st, PC in the next st, [dc in the next 3 sts, PC in the next st] twice, dc in the next st} 3 times, (2 dc, ch 2, 2 dc) in the next ch-2 corner sp, dc in the next st, PC in the next st, dc in the next 3 sts, PC in next st, join with slip st to beg st. < 48 dc, 12 PC, 4 ch-2 corner sp >
Rnd 5: STsc, dc in the next st and in each st across to the next ch-2 corner sp, [(2 dc, ch 2, 2 dc) in the ch-2 corner sp, dc in each st across to the next ch-2 corner sp] 3 times, (2 dc, ch 2, 2 dc) in the ch-2 corner sp, dc across to the beg st, join with slip st to beg st. < 76 dc, 4 ch-2 corner sp >
Rnd 6: With CC, slip st in the next st, (STsc, 2 dc) in the same st, ch 1, sk 3 sts, GS in the next st, ch 1, sk 3 sts, {(GS, ch 3, GS) in the ch-2 corner sp, [ch 1, sk 3 sts, GS in the next st] across to the next ch-2 corner sp, ch 1, sk 3 sts} 3 times, (GS, ch 3, GS) in the ch-2 corner sp, [ch 1, sk 3 sts, GS in the next st] twice, ch 1, sk 3 sts, join with slip st to beg st. < 24 GS, 20 ch-1 sp, 4 ch-3 corner sp >
Rnd 7: Slip st in each st across to and into the next ch-1 sp, (STsc, 2 dc) in the ch-3 corner sp, ch 1, GS in the next ch-1 sp, ch 1, (GS, ch 3, GS) in the ch-3 corner sp, {ch 1, [GS in the next ch-1 sp, ch 1] across to the next ch-3 corner sp, (GS, ch 3, GS) in the ch-3 corner sp} 3 times, ch 1, [GS in the next ch-1 sp, ch 1] 3 times, join with slip st to beg st. < 28 GS, 24 ch-1 sp, 4 ch-3 corner sp >
Rnd 8: With CB, STsc, dc in each st and ch-1 sp across to the next ch-3 corner sp, (2 dc, ch 2, 2 dc) in the ch-3 corner sp, [dc in each st and ch-1 sp across to the next ch-3 corner sp, (2 dc, ch 2, 2 dc) in the ch-3 corner sp] 3 times, dc in each st and ch-1 sp across to the beg st, join with slip st to beg st. < 124 dc, 4 ch-2 corner sp >
Rnd 9: STsc, dc in the next 2 sts, [PC in the next st, dc in the next 3 sts] twice, PC in the next st, dc in the next st, (2 dc, ch 2, 2 dc) in the ch-2 corner sp, {dc in the next st, [PC in the next st, dc in the next 3 sts] 7 times, PC in the next st, dc in the next st, (2 dc, ch 2, 2 dc) in the ch-2 corner sp} 3 times, dc in the next st, [PC in the next st, dc in the next 3 sts] 4 times, PC in the next st, join with slip st to beg st. < 108 dc, 32 PC, 4 ch-2 corner sp >
Rnd 10: Rep Rnd 5. < 156 dc, 4 ch-2 corner sp >
Rnd 11: With CA, slip st in the next st, (STsc, 2 dc) in the same st, ch 1, sk 3 sts, [GS in the next st, ch 1, sk 3 sts] 3 times, (GS, ch 3, GS) in the ch-2 corner sp, {ch 1, sk 3 sts, [GS in the next st, ch 1, sk 3 sts] 9 times, (GS, ch 3, GS) in the ch-2 corner sp} 3 times, ch 1. sk 3 sts, [GS in the next st, ch 1, sk 3 sts] 5 times, join with slip st to beg st. < 44 GS, 40 ch-1 sp, 4 ch-3 corner sp >
Rnd 12: Slip st in each st across to and into next ch-1 sp, (STsc, 2 dc) in the same sp, ch 1, [GS in the next ch-1 sp, ch 1] 3 times, (GS, ch 3, GS) in the ch-3 corner sp, {ch 1, [GS in the next ch-1 sp, ch 1] across to the next ch-3 corner sp, (GS, ch 3, GS) in the ch-3 corner sp} 3 times, ch 1, [GS in the ch-1 next sp, ch 1] 6 times, join with slip st to beg st. < 48 GS, 44 ch-1 sp, 4 ch-3 corner sp >
Rnd 13 (Edging): With CC, ch 1, sc in the same st and in each st and ch-1 sp across to the ch-3 corner sp, 3 sc in the ch-3 corner sp, [sc in the next st and in each st and ch-1 sp across to the next ch-3 corner sp, 3 sc in the ch-3 corner sp] 3 times, sc in the next st and in each sc and ch-1 sp across to the beg st, join with slip st to beg st. < 200 sc >
Fasten off and weave in ends. The granny square panel is complete; set aside.
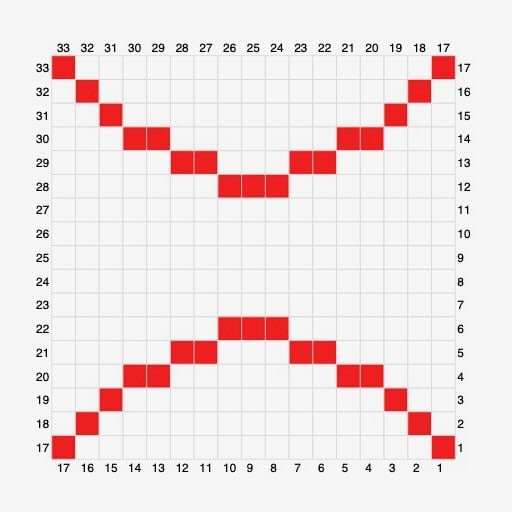
C2C (corner to corner) Panel
Notes
- Because the back of the panel won’t be visible, some ends can be carried across the back instead of being cut. This will reduce the number of ends that need to be woven in.
- I recommend making a couple of small bobbins in each color for places that may be too far apart to carry the yarn.
- Even numbered rows are RS and read from right to left in the chart.
- Odd numbered rows are WS and read from left to right in the chart.
- All color changes should be made on the WS of the panel.
- If red and white are not part of your team colors, use CB (red) and CC (white) for this panel only.
Increase at both ends of the row.
With CB, ch 6.
→ Row 1 (WS): (CB) x 1, turn. < 1 block >
← Row 2 (RS): (CC) x 2, turn. < 2 blocks >
→ Row 3 (WS): (CC) x 1, (CB) x 1 (CC) x 1, turn. < 3 blocks >
← Row 4 (RS): (CC) x 4, turn. < 4 blocks >
→ Row 5 (WS): (CC) x 2, (CB) x 1, (CC) x 2, turn. < 5 blocks >
← Row 6 (RS): (CC) x 6, turn. < 6 blocks >
→ Row 7 (WS): (CC) x 3, (CB) x 1, (CC) x 3, turn. < 7 blocks >
← Row 8 (RS): (CC) x 4, (CB) x 1, (CC) x 3, turn. < 8 blocks >
→ Row 9 (WS): (CC) x 9, turn. < 9 blocks >
← Row 10 (RS): (CC) x 5, (CB) x 1, (CC) x 4, turn. < 10 blocks >
→ Row 11 (WS): (CC) x 4, (CB) x 1, (CC) x 6, turn. < 11 blocks >
← Row 12 (RS): (CC) x 12, turn. < 12 blocks >
→ Row 13 (WS): (CC) x 5, (CB) x 1, (CC) x 7, turn. < 13 blocks >
← Row 14 (RS): (CC) x 8, (CB) x 1, (CC) x 5, turn. < 14 blocks >
→ Row 15 (WS): (CC) x 4, (CB) x 2, (CC) x 9, turn. < 15 blocks >
← Row 16 (RS): (CC) x 11, (CB) x 2, (CC) x 3, turn. < 16 blocks >
→ Row 17 (WS): (CB) x 4, (CC) x 9, (CB) x 4, turn. < 17 blocks >
Decrease at both ends of the row.
← Row 18 (RS): (CC) x 3, (CB) x 2, (CC) x 11, turn. < 16 blocks >
→ Row 19 (WS): (CC) x 9, (CB) x 2, (CC) x 4, turn. < 15 blocks >
← Row 20 (RS): (CC) x 5, (CB) x 1, (CC) x 8, turn. < 14 blocks >
→ Row 21 (WS): (CC) x 7, (CB) x 1, (CC) x 5, turn. < 13 blocks >
← Row 22 (RS): (CC) x 12, turn. < 12 blocks >
→ Row 23 (WS): (CC) x 6, (CB) x 1, (CC) x 4, turn. < 11 blocks >
← Row 24 (RS): (CC) x 4, (CB) x 1, (CC) x 5, turn. < 10 blocks >
→ Row 25 (WS): (CC) x 9, turn. < 9 blocks >
← Row 26 (RS): (CC) x 3, (CB) x 1, (CC) x 4, turn. < 8 blocks >
→ Row 27 (WS): (CC) x 3, (CB) x 1, (CC) x 3, turn. < 7 blocks >
← Row 28 (RS): (CC) x 6, turn. < 6 blocks >
→ Row 29 (WS): (CC) x 2, (CB) x 1, (CC) x 2, turn. < 5 blocks >
← Row 30 (RS): (CC) x 4, turn. < 4 blocks >
→ Row 31 (WS): (CC) x 1, (CB) x 1, (CC) x 1, turn. < 3 blocks >
← Row 32 (RS): (CC) x 2, turn. < 2 blocks >
→ Row 33 (WS): (CB) x 1.
Fasten off; continue to Edging Round.
Edging Round for the C2C panel
With RS facing, attach CC to any corner, ch 1.
Work 3 sc across the side of each block. That may be the ch-3 of the block, or the bottom or the top of the block. When you reach a corner, simply rotate 90 degrees to work sc along the next side. At the end of the 4th side, join with slip st to beg st.
Fasten off and weave in all ends. The C2C Panel is complete.
The Chart for the C2C Panel
Assembly
Notes
- The panels are crocheted together with a sc through both loops of both panels.
- The stitch counts around both panels should be similar to each other. However, connect the panels with a stitch marker at each corner to ensure everything is lined up properly.
- With wrong sides of the panels held together, attach CC to any corner through both loops of both panels.
- Ch 1, sc in the same st and in each st around 3 sides, being sure the corners match.
- When you reach the beginning of the 4th and final side, insert the pillow form and continue to sc across to close the pillow.
- Join with a slip st to the beg sc. Secure the end and weave it in.
Your Baseball Pillow is complete! Time to cheer on your favorite team!

3 Comments