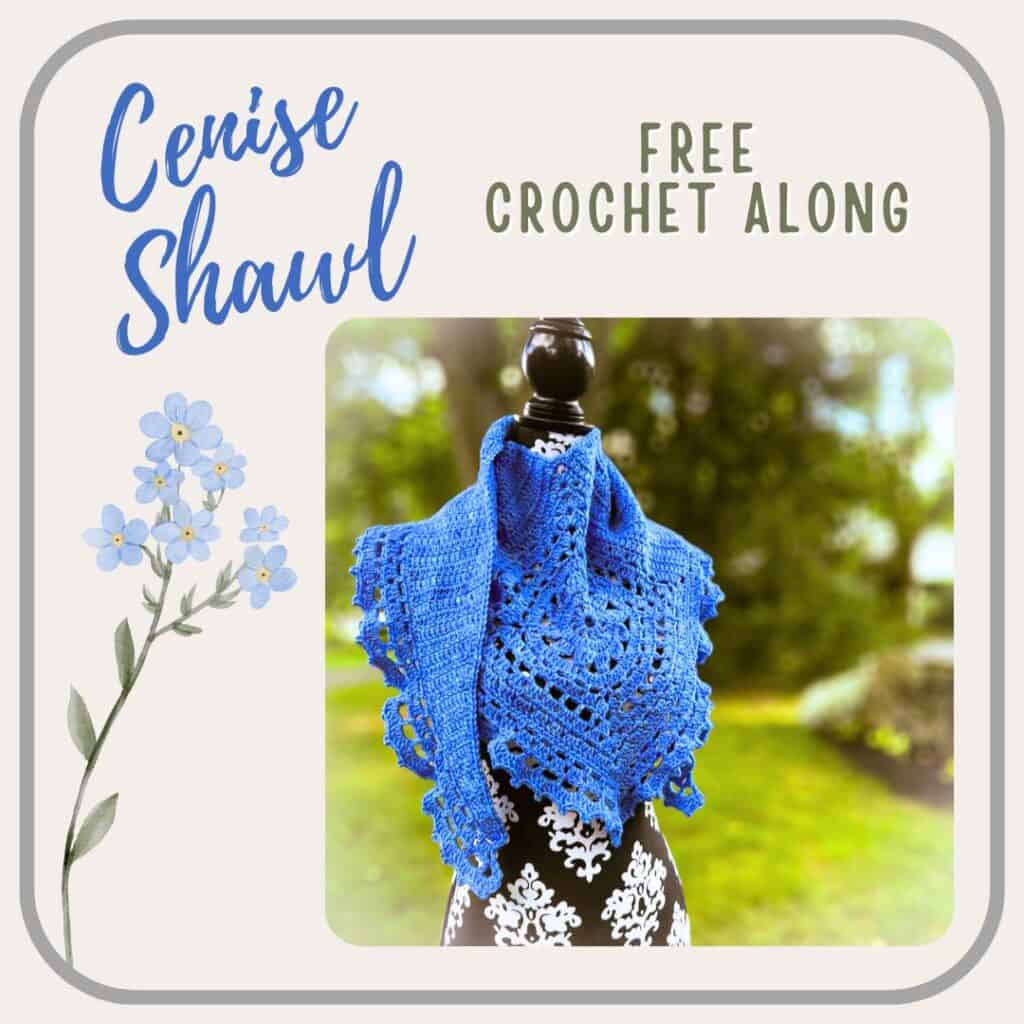
A crochet shawl that’s the perfect combination of simple and elegant
If you love a project that’s fun from the first stitch to wrapping it around your neck, the Cenise Shawl needs to be your next crochet shawl.
The Cenise Shawl is a free crochet along that runs August 5th-22nd. The entire pattern will be available in this post at the conclusion of the CAL. Find the crochet along details here.
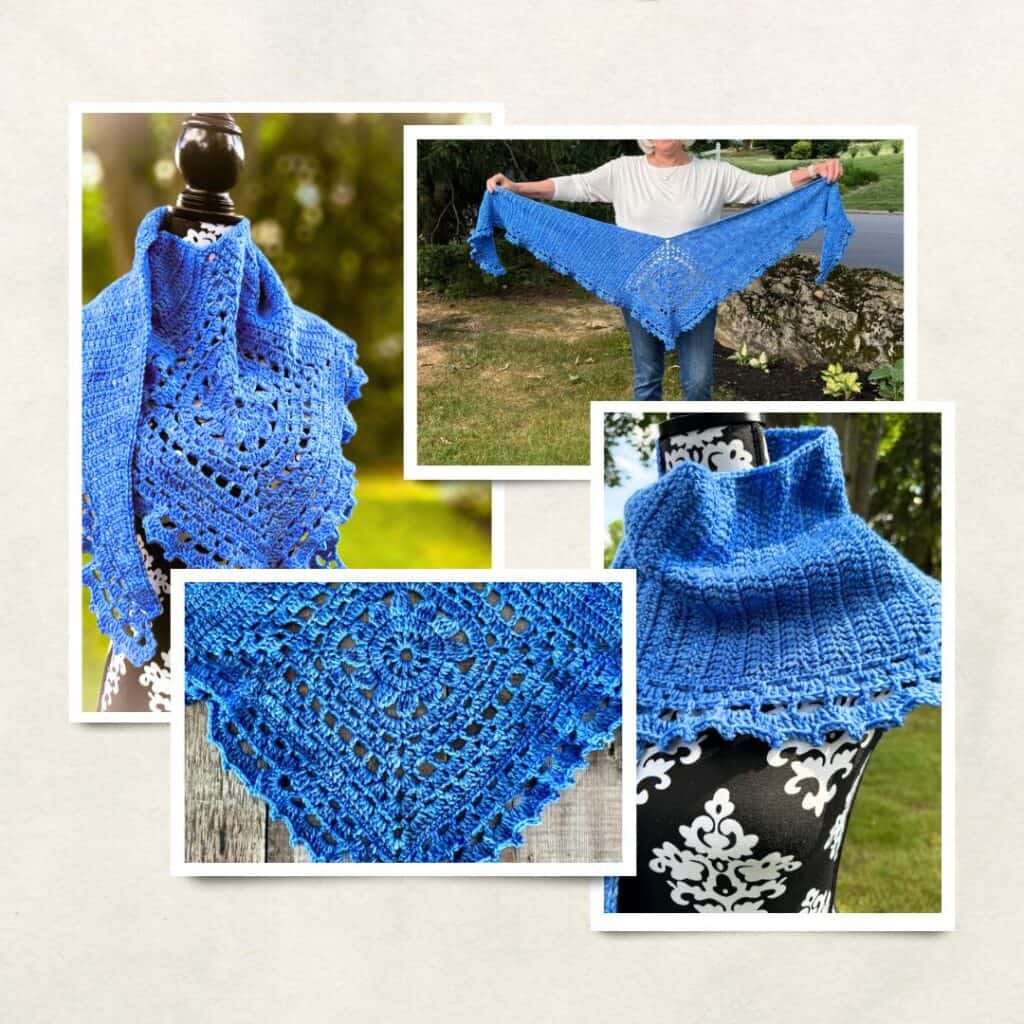
The Cenise Crochet Shawl
I love wearing a beautiful accessory like a crochet shawl, don’t you? It’s such an ideal accessory for fickle temperatures. Plus, it adds just the perfect style to any outfit. Add simple construction to a modified granny square and you have a fantastic handmade piece that’s just as much fun to make as it is to wear.
The Cenise Shawl was created to provide an experience that’s special from start to finish to wearing out and about. It’s sure to become a favorite, go-to accessory when you want to dress up a casual outfit or wrap up against a cool breeze. I can’t wait to wear my crochet shawl this fall!
Design + Construction
I’ve always wanted to design a crochet shawl. I’ve made a number of them over the years. I love the look and versatility a crochet shawl offers, being equally at home worn as a scarf and as a wrap.
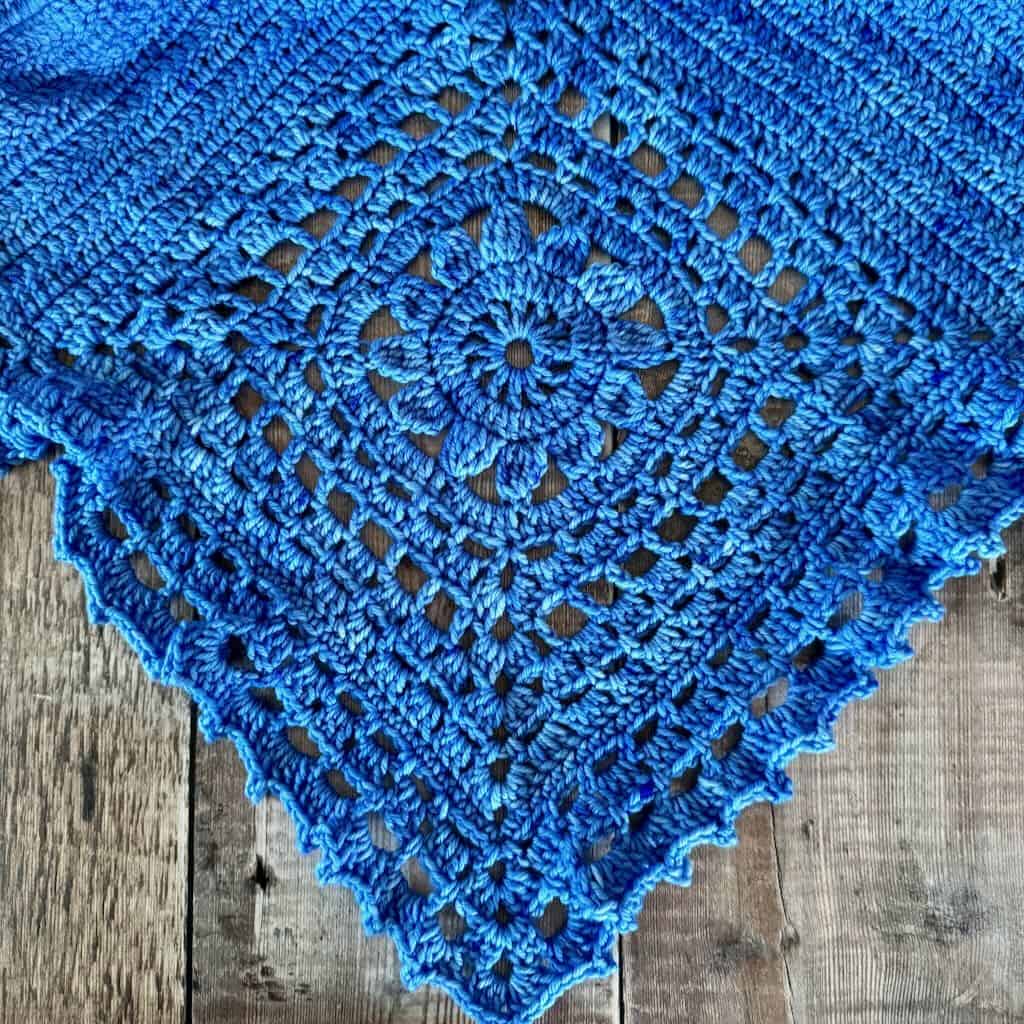
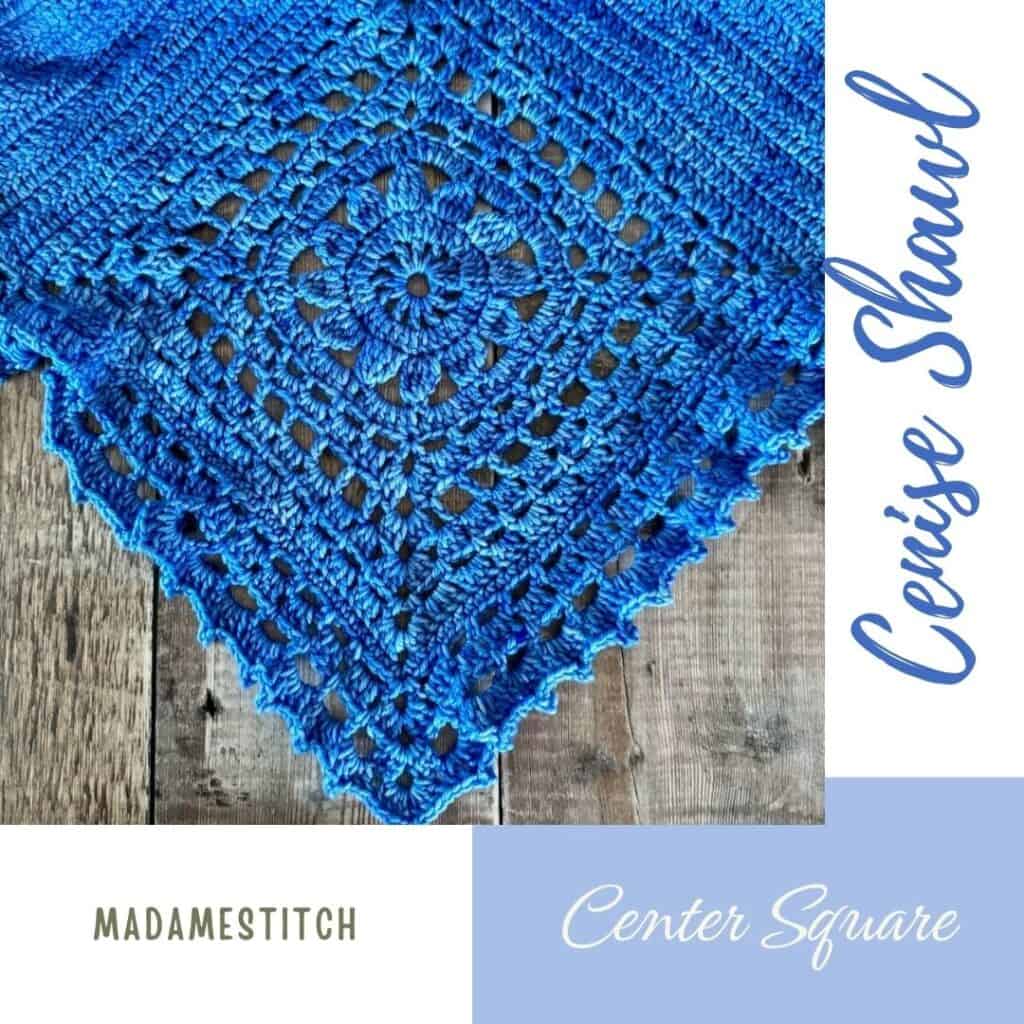
And, because I love granny squares so much, I wanted to create a crochet shawl that started with a granny square. There are a number of elements in the center square but the granny stitch is a prominent part of it.
The center square is a beautiful variation of the granny square. Worked from the beginning as a circle, the square is built out from the center circle. You’ll find a variety of stitches beyond the basics including 4-treble crochet clusters and granny stitches worked in chain spaces for an open, airy look.
The 2 identical wings are worked completely in double crochet with decreases along one edge to create the shape of the shawl. This part of the crochet shawl makes a wonderful mindful make but you will have to keep track of where the decreases are.
A gorgeous border of granny stitches and shells topped with picots, all worked in chain spaces, finishes the shawl off with that same open look you found in the center square.
While the overall construction is straightforward, the combination of the stitches and techniques creates a one-of-a-kind look.

The Cenise Shawl is an elegant, stylish accessory that blends vintage granny square elements with modern stitch techniques for a truly unique experience. You’ll love the compliments you get when you wear your very own Cenise Crochet Shawl!
The Yarn for the Cenise Crochet Shawl
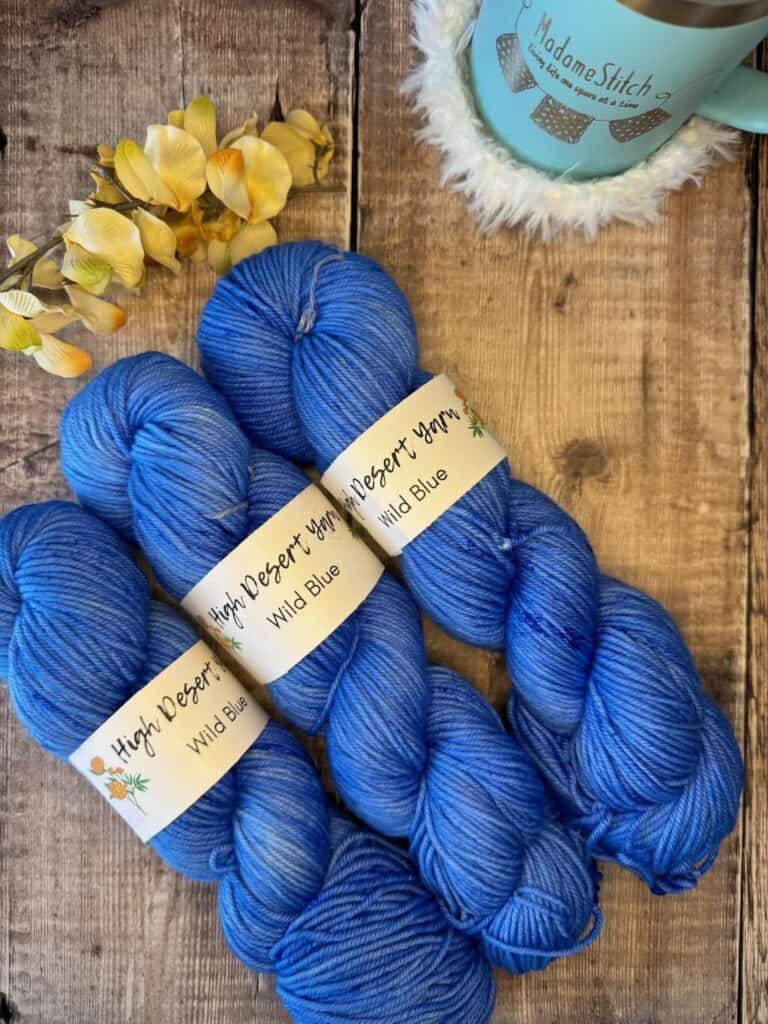
The Cenise Shawl was designed in collaboration with High Desert Yarn. Joanna hand-dyed the beautiful “Cloudcroft DK” superwash merino in Wild Blue that I used to make the original shawl. This gorgeous yarn is available in the High Desert Yarn Etsy shop. You’ll need 3 hanks.
I recognize that the price point on the hand-dyed yarn might be too steep for some. So, if you choose another DK weight yarn, you’ll need approx. 650 yards to complete the crochet shawl. That’s more than you’ll need of the merino wool; however, the extra yardage ensures you aren’t playing yarn chicken when you get to the border!
Yarn Substitute
I made 2 samples of this crochet shawl to see how it would work up with different fiber contents. I was surprised by how much more yarn I used in the 2nd sample.
I used Scheepjes “Stone Washed” 22% acrylic, 78% cotton sport weight (50g/130m). I used around 650yds which translates to 5 skeins.
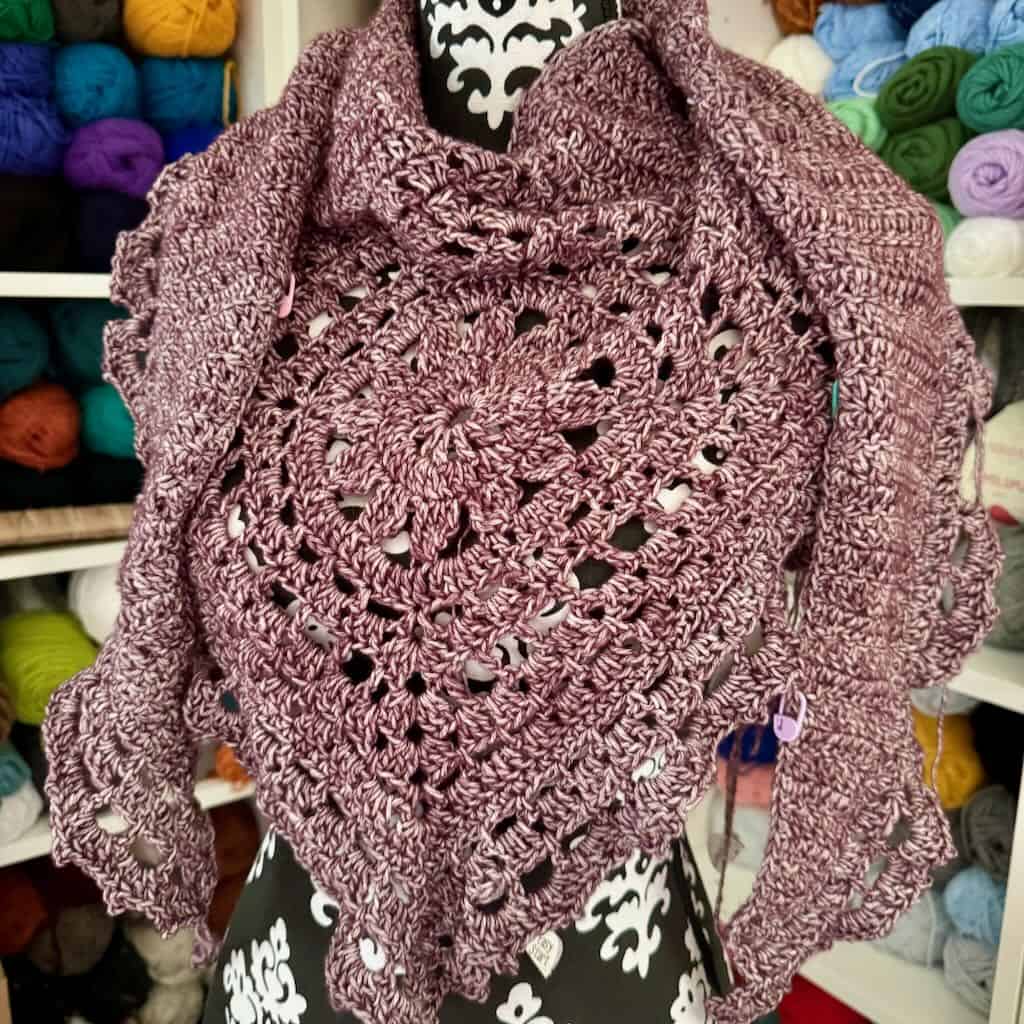
I must admit that I didn’t pay a lot of attention to gauge because the size of the shawl can vary if necessary. But the crochet shawl made in Scheepjes wasn’t significantly larger in size. The wings were a bit longer but overall it’s about the same size.
If you choose a yarn in a fiber other than merino, I recommend having at least 650 yds on hand to ensure you have enough yarn to finish the crochet shawl.

The Cenise Shawl free crochet along
Join in the fun!
With the first part of this free pattern releasing on Monday, August 5th, to the final release on Thursday, August 22nd, you’ll have fun making your very own shawl with friends.
Visit the CAL post to find out how you can be a part of this fun event!
Where to get the premium PDF for the Cenise Shawl
The Cenise Shawl is a free crochet pattern in this blog post as part of a free crochet along that runs August 5th – 22nd, 2024. Sections of the free pattern will be added during the crochet along with the full pattern available on August 22nd. Scroll down to view the free version.
If you’d prefer a printer friendly and downloadable version of the PDF, I recommend you purchase it from one of my shops.
The premium PDF can be uploaded to your favorite mobile device so you can take your Cenise Shawl project with you to work on whenever you’re out and about.
The PDF is easy to read and beautifully formatted without ads for a great experience. You’ll also get a chart for the center square, a schematic of key measurements, and a diagram helping with stitch counts in the Border.
Get your copy today!


The Cenise Shawl free crochet pattern starts here!
Materials
Yarn
High Desert Yarn “Cloudcroft DK” 100% superwash merino (231yd/100g) – 3 hanks of Wild Blue – approx. 560yd
Any sport or DK weight yarn will work. Be sure to have at least 650 yds on hand to complete the shawl.
Hook
US size H-8 (5mm) or size needed to meet gauge
Tools
- Removable stitch markers (about 25-30)
- Tapestry needle for weaving in ends
General Information
Finished Measurements: 64″ wingspan x 16″ depth

Gauge: 16 dc x 8.5 rows = 4″ (blocked)
Make a Gauge Swatch
While meeting gauge in this crochet shawl isn’t a do or die situation, it is essential to ensure you get the finished measurements listed here and that you’ll not run out of yarn. So, let’s make a gauge swatch.
The gauge is based on the double crochet from the wings. Once you reach the proper gauge, maintain the same tension throughout the shawl components.
Gauge Swatch Instructions
Ch 25.
Row 1: Dc in the 3rd ch from the hook and in each ch across, turn. < 24 dc >
Row 2: STsc, dc in the next st and in each st across, turn.
Rows 3-13: Rep Row 2. Fasten off.
Block the swatch in the method best suited to the yarn’s fiber content and using the method you’ll use for the finished crochet shawl.
The gauge swatch should measure 6″ x 6″ blocked.
Tip: Measure gauge in the interior of the swatch, not along the edges.
Skill Level: Advanced beginner/Intermediate
Abbreviations – US crochet terminology
- beg – beginning
- ch – chain
- dc – double crochet
- hdc – half double crochet
- rep – repeat
- rnd(s) – round(s)
- sc – single crochet
- sk – skip
- sp – space
- st(s) – stitch(es)
- tr – treble crochet
- mm – move marker
- pm – place marker
- rm – remove marker
- RS – right side
- WS – wrong side
- YO – yarn over
Special Stitches
3-tr cluster (to begin a rnd): {[YO twice, insert hook in indicated st, YO, pull up loop, [YO, pull through 2 loops] twice}, YO twice, insert hook in next st, YO, pull up loop, [YO, pull through 2 loops] twice, YO, pull through 4 loops on hook.
4-tr cluster – {YO twice, insert hook in next st, YO, pull up loop, [YO, pull through 2 loops] twice} twice, YO twice, insert hook in same st, YO, pull up loop, [YO, pull through 2 loops] twice, YO twice, insert hook in next st, YO, pull up loop, [YO, pull through 2 loops] twice, YO, pull through 5 loops.
Granny stitch (GS) – 3 dc in the same st or sp
Picot – Ch 3, slip st in 1st ch made
Standing double crochet (ST dc)– Make a slip knot and insert hook in indicated st, holding knot to the back of the hook, YO, insert hook in indicated at, YO, pull up loop, YO, pull through 2 loops, YO, pull through 2 loops.
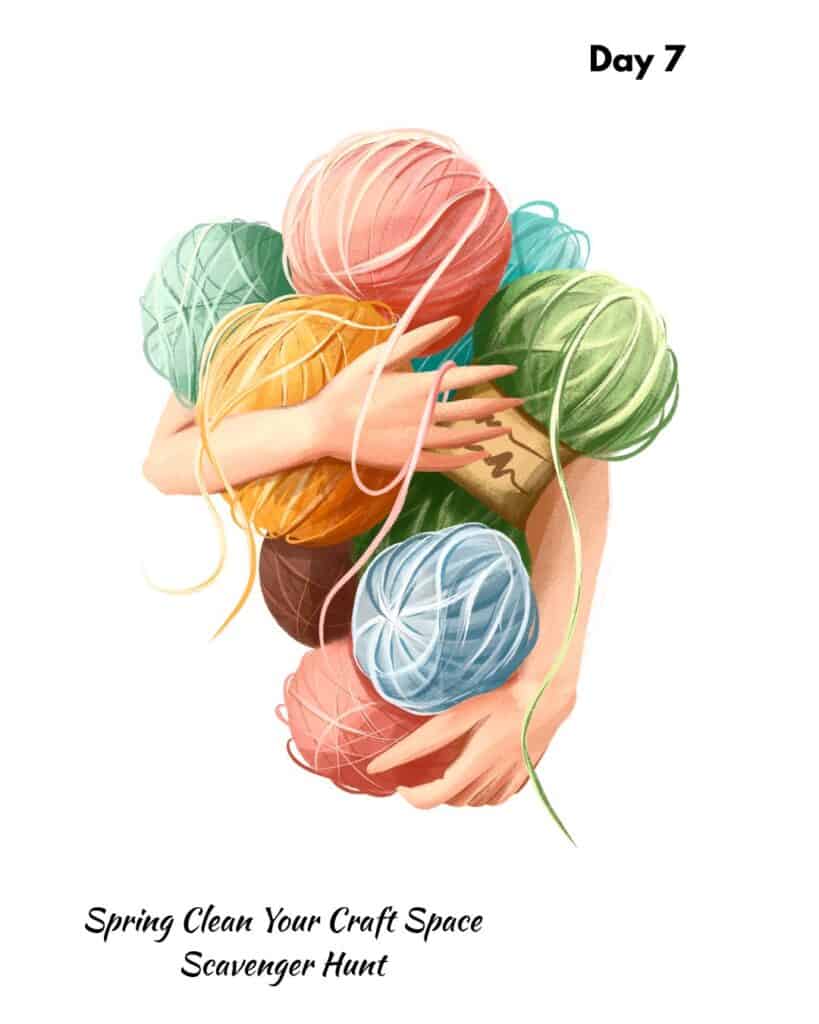
Spring cleaning lets you create your space your way.
Click on the graphic.
- If the entry form pops up, fill it out.
- If it doesn’t, visit the next post.
Good luck!
Written Instructions
The Center Square – August 5th
Notes for Center Square
- Do not turn after any rnd. Work with RS always facing you.
- A ch 2 or ch 3 may be substituted for the STsc at any time without altering the construction
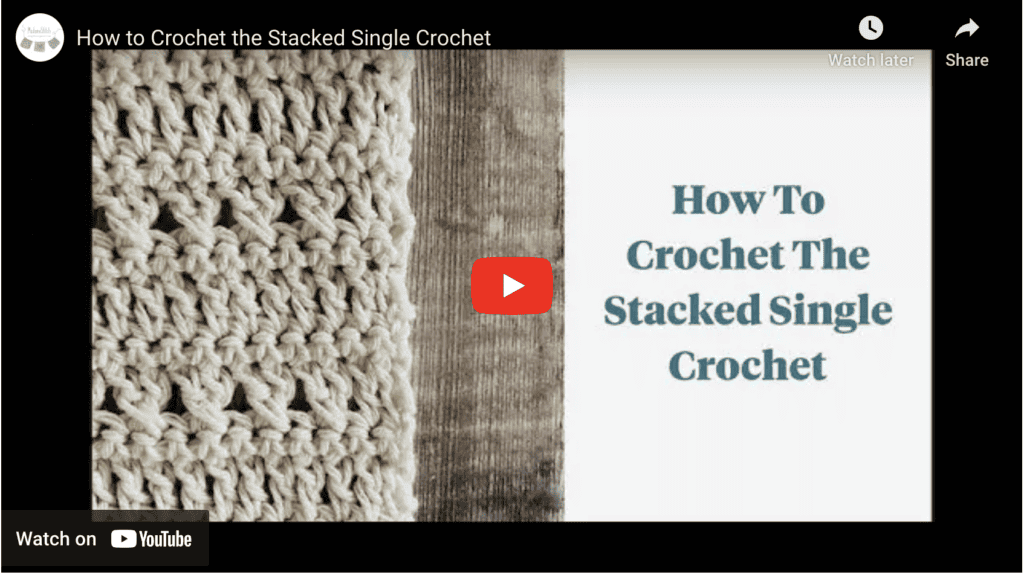
Links to Video Tutorials
Ch 8. Join with a slip st to form a ring.
Rnd 1: STsc, ch 1, [dc in the ring, ch 1] 11 times, join with slip st to beg st. < 12 dc, 12 ch-1 sp >
Rnd 2: STsc, 2 dc in the ch-1 sp, [dc in the next st, 2 dc in the ch-1 sp] 11 times, join with slip st to beg st. < 36 dc >
Rnd 3: Ch 3, 3-tr cluster over the next 2 sts (counts as 1st 4-tr cluster), ch 4, [4-tr cluster over the next 3 sts, ch 4] 11 times, join with slip st to top of beg cluster. < 12 4-tr clusters, 12 ch-4 sp >
Rnd 4: STsc, 5 dc in the ch-4 sp, [dc in the top of the next cluster, 5 dc in the ch-4 sp] 11 times, join with slip st to beg st. < 72 dc >
Note: Rnd 5 begins the build out from the circle to a square.
Rnd 5: Pull loop up to height of sc, (sc, ch 4, sc) in the same st, [ch 3, sk 2 sts, sc in the next st] 5 times, ch 3, sk 2 sts, {(sc, ch 4, sc) in the next st, [ch 3, sk 2 sts, sc in the next st] 5 times, ch 3, sk 2 sts} 3 times, join with slip st to beg sc. < 28 sc, 24 ch-3 sp, 4 corner ch-4 sp >
Rnd 6: Slip st in the ch-4 sp, (STsc, 2 dc, ch 3, GS) in the ch-4 sp, GS in the next 2 ch-3 sp, 3 hdc in each of the next 2 ch-3 sp, GS in the next 2 ch-3 sp, [(GS, ch 3, GS) in the ch-4 sp, GS in the next 2 ch-3 sp, 3 hdc in each of the next 2 ch-3 sp, GS in the next 2 ch-3 sp] 3 times, join with slip st to beg st. < 24 hdc, 24 GS, 4 ch-3 corner sp >
Note for Rnd 7: The dc are worked in the middle st of each group of 3 sts from the previous rnd.
Rnd 7: Slip st in the next st, STsc, ch 1, (GS, ch 3, GS) in the ch-3 corner sp, {ch 1, sk 1 st, dc in the next st, [ch 3, sk 2 sts, dc in the next st] 7 times, ch 1, sk 1 st, (GS, ch 3, GS) in the ch-3 corner sp} 3 times, ch 1, sk 1 st, dc in the next st, [ch 3, sk 2 sts, dc in the next st] 6 times, ch 3, sk 2 sts, join with slip st to beg st. < 32 dc, 8 GS, 8 ch-1 sp, 28 ch-3 sp, 4 ch-3 corner sp >
Rnd 8: Slip st in the ch-1 sp, (STsc, 2 dc) in the ch-1 sp (counts as 1st GS), (GS, ch 3, GS) in the ch-3 corner sp, GS in each sp across to the next corner, [(GS, ch 3, GS) in the ch-3 corner sp, GS in each sp across to the next corner] twice, (GS, ch 3, GS) in the ch-3 corner sp, GS in each sp across to the beg st, join with slip st to beg st. < 44 GS, 4 ch-3 corner sp >
Note for Rnd 9: The sc will be worked in the sp between GS where a ch-1 sp would normally be worked.
Rnd 9: Do not ch, sc in the sp to the right of the hook, ch 3, sc in the next sp, ch 3, (sc, ch 4, sc) in the ch-3 corner sp, {ch 3, [sc in the next sp, ch 3] across to the next ch-4 corner sp, (sc, ch 4, sc) in the ch-4 corner sp} 3 times, ch 3, [sc in the next sp, ch 3] across to beg sc, join with slip st to beg sc. < 48 sc, 44 ch-3 sp, 4 ch-4 corner sp >
Rnd 10: Slip st in the ch-3 sp, (STsc, 2 dc) in the sp (counts as 1st GS), GS in the next sp, (GS, ch 3, GS) in the ch-4 corner sp, [GS in each sp across to the next corner, (GS, ch 3, GS) in the ch-4 corner sp] 3 times, GS in each sp across, join with slip st to beg st. < 52 GS, 4 ch-3 corner sp > Fasten off.
Wing 1 – August 8th

Notes for both wings
- Turn at the end of each row.
- Place marker in the end of each row that has no dec, along the dec edge. This will help you keep track of where the decreases should be made. Move the marker up after working the next non-decrease row in the 3-row sequence.
- Count often!
Link to video tutorial
Row 1 (RS): ST dc in any corner, dc in the next st and in each st across to the next corner, dc in the corner, pm in the corner sp of the center square, turn. < 41 dc >
Row 2 (WS): STsc, dc2tog over the next 2 sts, dc in the next st and in each st across, turn. < 40 dc >
Row 3: STsc, dc in the next st and in each st across to the last 3 sts, dc2tog over the next 2 sts, dc in the last st, turn. < 39 dc >
Row 4: STsc, pm, dc in the next st and in each st across, turn. < 39 dc >
Row 5: STsc, dc in the next st and in each st across to the last 3 sts, dc2tog over the next 2 sts, dc in the last st, turn. < 38 dc >
Row 6: STsc, dc2tog over the next 2 sts, dc in the next st and in each st across, turn. < 37 dc >
Row 7: STsc, mm, dc in the next st and in each st across, turn. < 37 dc >
Row 8: STsc, dc2tog over the next 2 sts, dc in the next st and in each st across, turn. < 36 dc >
Row 9: STsc, dc in the next st and in each st across to the last 3 sts, dc2tog over the next 2 sts, dc in the last st, turn. < 35 dc >
Row 10-51: Rep Rows 4-9 7 times. < 7 dc >
Rows 52-54: Rep Rows 4-6. < 5 dc >
Row 55: STsc, mm, dc in the next st and in each st across, turn. < 5 dc >
Row 56: STsc, dc2tog over the next 2 sts, dc in the last 2 sts, turn. < 4 dc >
Row 57: STsc, dc2tog over the next 2 sts, dc in the last st, turn. < 3 dc >
Row 58: STsc, dc in the next 2 sts, turn. < 3 dc >
Row 59: STsc, dc2tog over the last 2 sts, turn. < 2 dc >
Row 60: No ch, sc in the 1st st, dc in the last st, pm at the tip of Wing 1. < 1 sc, 1 dc >
Fasten off.
Wing 2 – August 12th
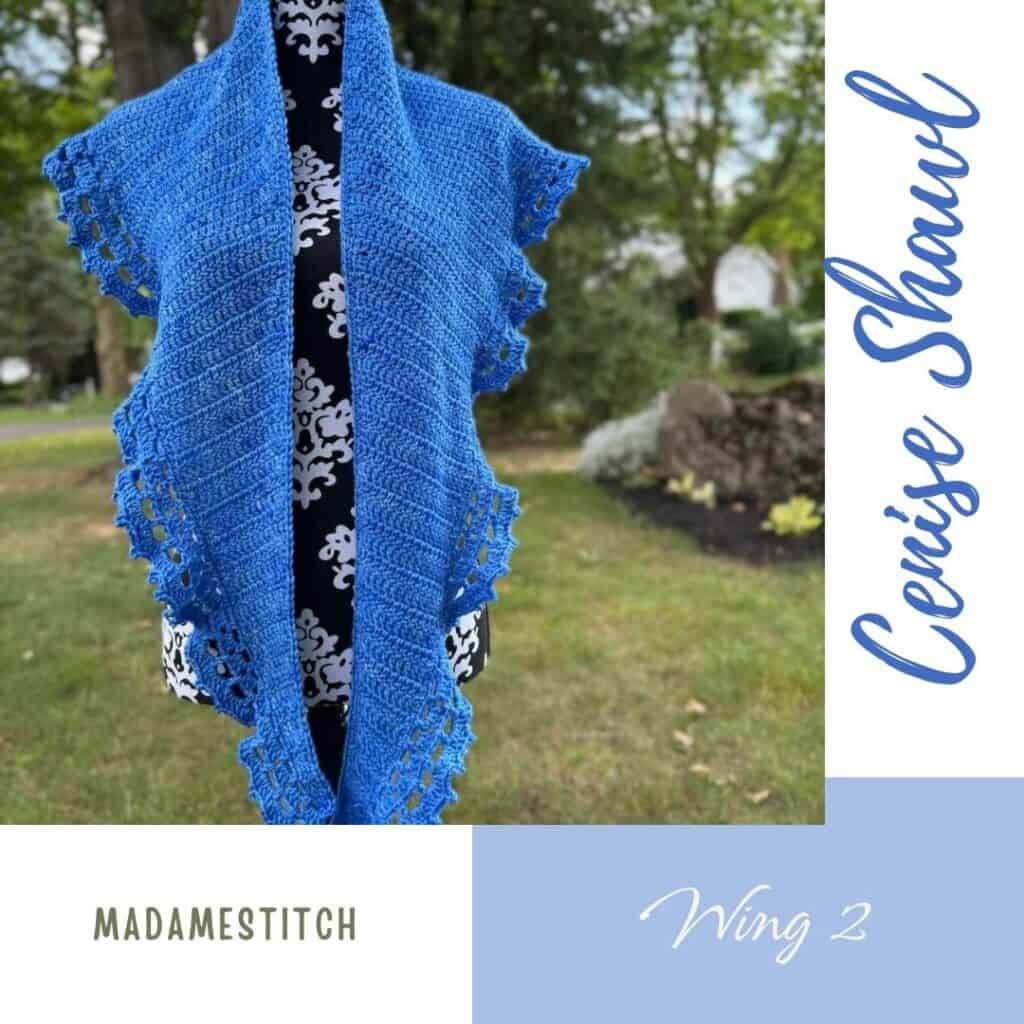
With RS facing, attach yarn to the center square corner sp at the end of Row 1 of Wing 1 where the marker is.
Row 1 (RS): STsc, dc in the next st and in each st across to the next corner sp, dc in the corner sp, turn. < 41 dc >
Row 2 (WS): STsc, dc in the next st and in each st across to the last 3 sts, dc2tog over the next 2 sts, dc in the last st, turn. < 40 dc >
Row 3: STsc, dc2tog over the next 2 sts, dc in the next st and in each st across, turn. < 39 dc >
Row 4: STsc, dc in the next st and in each st across, pm, turn. < 39 dc >
Row 5: STsc, dc2tog over the next 2 sts, dc in the next st and in each st across, turn. < 38 dc >
Row 6: STsc, dc in the next st and in each st across to the last 3 sts, dc2tog over the next 2 sts, dc in the last st, turn. < 37 dc >
Row 7: STsc, dc in the next st and in each st across, mm, turn. < 37 dc >
Row 8: STsc, dc in the next st and in each st across to the last 3 sts, dc2tog over the next 2 sts, dc in the last st, turn. < 36 dc >
Row 9: STsc, dc2tog over the next 2 sts, dc in the next st and in each st across, turn. < 35 dc >
Row 10-51: Rep Rows 4-9 7 times. < 7 dc >
Rows 52-54: Rep Rows 4-6. < 5 dc >
Row 55: STsc, dc in the next st and in each st across, mm, turn. < 5 dc >
Row 56: STsc, dc in the next st, dc2tog over the next 2 sts, dc in the last st, turn. < 4 dc >
Row 57: STsc, dc2tog over the next 2 sts, dc in the last st, turn. < 3 dc >
Row 58: STsc, dc in the next 2 sts, turn. < 3 dc >
Row 59: STsc, dc2tog over the last 2 sts, turn. < 2 dc >
Row 60: No ch, sc in the 1st st, dc in the last st, pm at the tip of Wing 2. < 1 sc, 1 dc >
Fasten off.
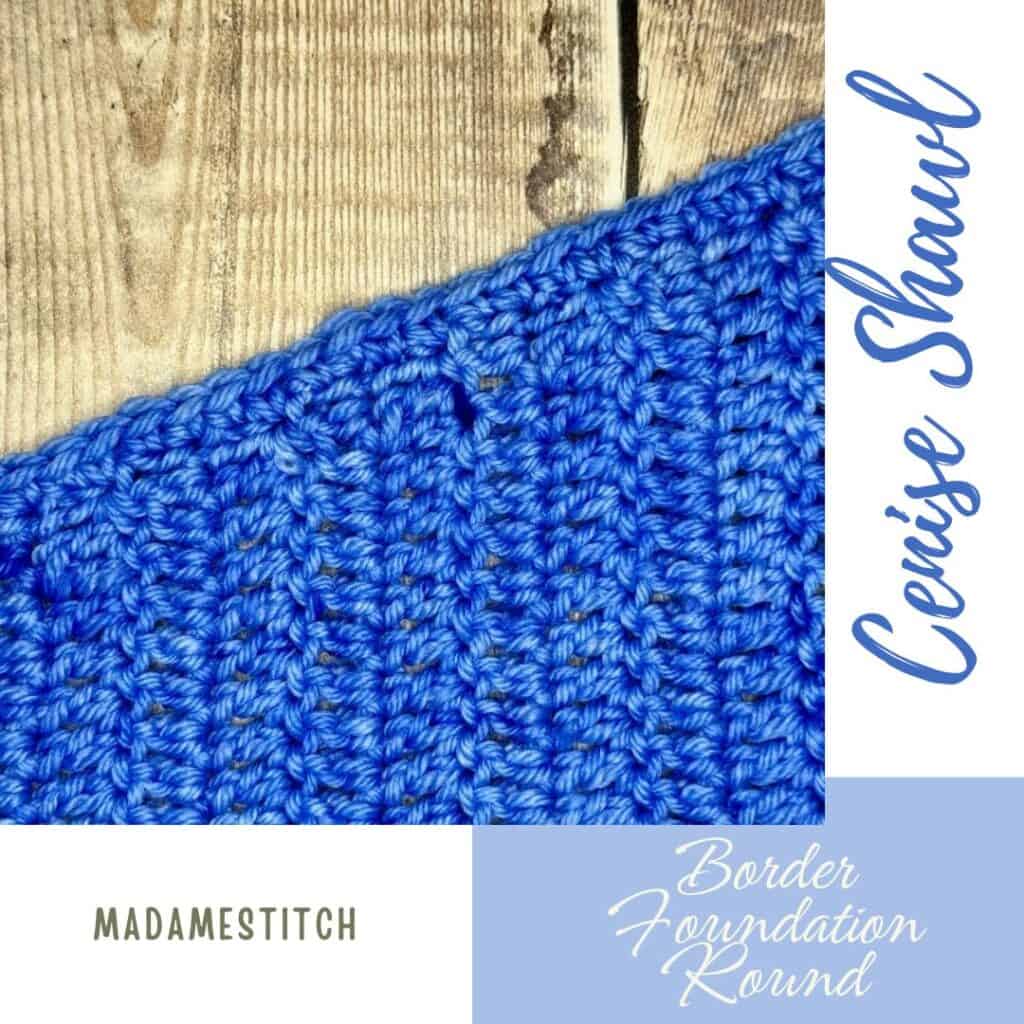
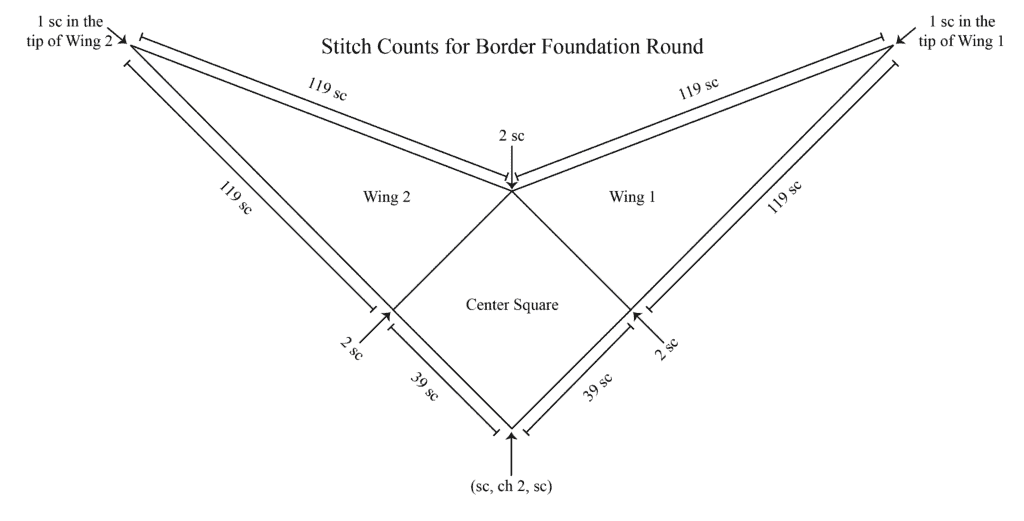
The Border Foundation Round – August 15th
Video Tutorial for this round and the entire border
Before starting the Border Foundation Round, place markers along the sides of the wings to ensure the correct # of sts. Here’s how:
- With RS facing, lay out Wing 1.
- Place a marker every 10 rows, between Rows 10 & 11, 20 & 21, etc, on both sides of the wing.
- Do the same for Wing 2.
- This marks off every 20 sts.
Tip: Work the sc through at least 2 strands of the dc at the end of the row for stability.
With RS facing, attach yarn to st with marker at the tip of Wing 1.
- Ch 1, sc in the same st as the marker, mm < 1 sc >
- Work 1 sc in the end of the 1st row, then 2 sc in the end of each row along the side of Wing 1 < 119 sc >
- 2 sc in corner sp (of the center square) between wings < 2 sc >
- Work 2 sc in the end of each row, 1 sc in the end of Row 60, along the side of Wing 2 < 119 sc >
- Sc in the st with the marker at the tip of Wing 2, mm < 1 sc >
- Work 1 sc in the end of the 1st row, then 2 sc in the end of each row along the opposite side of Wing 2 < 119 sc >
- 2 sc in the corner sp of the center square < 2 sc >
- Sc in the next st and in each st across to the next corner sp (the tip of the shawl) < 39 sc >
- (Sc, ch 2, sc) in the corner sp at the tip of the shawl < 2 sc, 1 ch-2 sp >
- Sc in the next st and in each st across to corner sp < 39 sc >
- 2 sc in the corner sp of the center square < 2 sc >
- Work 2 sc in the end of each row (1 sc in the end of Row 60) along the opposite side of Wing 1 < 119 sc >
- Join with a slip st to the beg st where the marker is, rm, turn.
Border Part 1 – August 19th
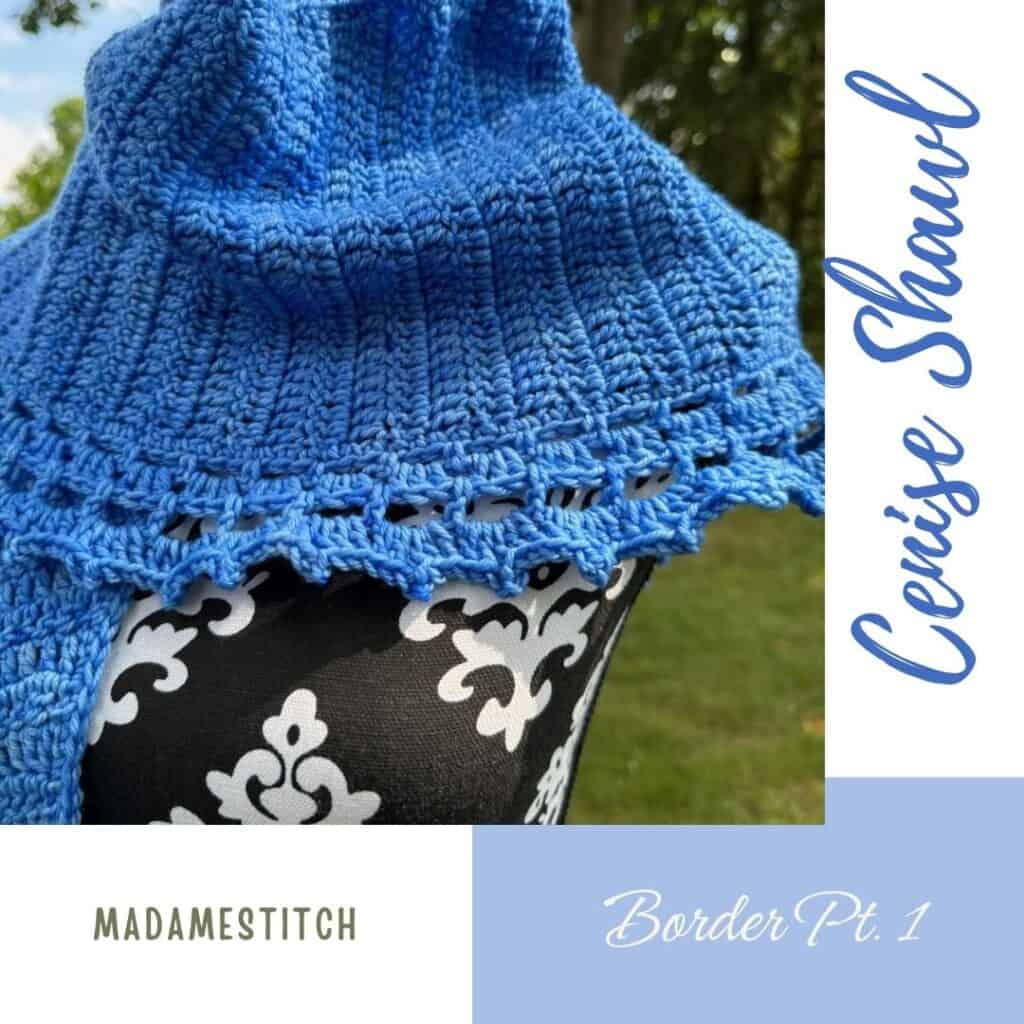
Note: Be sure you’ve turned after working the Border Foundation Round and are now working along the straight edges of the Wings and the unworked sides of the Center Square.
Row 1 (WS): Ch 1, sc in the same st (the st with marker), [ch 3, sk 2 sts, sc in the next st] across to the ch-2 corner sp (at the tip of the shawl), ch 3, sk 2 sts, (sc, ch 4, sc) in the ch-2 corner sp, [ch 3, sk 2 sts, sc in the next st] across to the tip of Wing 2, working the final sc in the st with the marker at the tip of Wing 2, rm, turn. < 110 sc, 108 ch-3 sp, 1 ch-4 corner sp >
Row 2 (RS): STSc, ch 1, GS in the next ch-3 sp and in each ch-3 sp across to the ch-4 corner sp, (GS, ch 2, GS) in the ch-4 corner sp, GS in the next ch-3 sp and in each ch-3 sp across to the last st, ch 1, dc in the last dc, turn. < 2 dc, 110 GS, 2 ch-1 sp, 1 ch-2 corner sp >
Border Part 2 – August 22nd
Note for Rnd 3: The dc are worked between GS where the ch-1 sp would normally be.
Row 3: STsc, ch 3, dc in the ch-1 sp, ch 3, [dc in the sp between GS, ch 3] across to the ch-2 corner sp, (GS, ch 3, GS) in the ch-2 corner sp, [ch 3, dc in the sp between GS] across to the ch-1 sp, ch 3, dc in ch-1 sp, ch 3, dc in the last dc, turn. < 112 dc, 112 ch-3 sp, 2 GS, 1 ch-3 corner sp >
Row 4: STsc, (2 dc, picot, 3 dc) in each ch-3 sp across to the ch-3 corner sp, (GS, ch 3, GS) in the ch-3 corner sp, (2 dc, picot, 3 dc) in each ch-3 sp across to the last st, dc in the last st. < 112 5 dc groups w/picots, 2 dc, 2 GS, 1 ch-3 corner sp >
Fasten off and weave in ends.
Block to the desired size. Note: When pinning the shawl for blocking, position the pins inside the border, leaving the border free to curl as it’s intended.
Your Cenise Shawl is finished! Enjoy wearing it and getting ALL the compliments.
I can’t wait to start the shawl
Janice,
I’m excited, too! See you back here Monday!
-Debbie
Beautiful Shawl, the yarn just came in over the weekend, so there is plenty of catching up to do. Just hope it turns out as Beautiful as yours. Can’t wait to start on it this week..Thank you
Oh, I’m so excited for you to get started. I don’t think you’ll have any trouble catching up!
Best,
Debbie